Request Manage is a mobile app for organisations to raise, track and resolve internal complaints (for example cleanliness, food, travel or maintenance issues) and to manage purchase requests for items such as equipment and supplies. Every request has a clear owner, a status, a history and its own comment thread, so nothing gets lost in phone calls, paper registers or WhatsApp groups.
Roles in the app
Each user signs in with a role. The role decides what they see and what they can do:
Google sign-in, and self-registration with admin verification.
Complaints
with type, priority (Low, Medium, High) and status: Pending, In Progress, Hold, Completed, Cancelled and Archived.
Claim
a maintenance user takes ownership of a complaint, so everyone knows who is working on it.
Attachments
photos and documents can be added to a complaint and downloaded by others.
Comments
a chat thread on every complaint and purchase request, with unread counts.
Urgent reminders
a pending complaint can be escalated with one tap.
Purchase requests
with several items per request, each with quantity, unit, current stock and remarks.
Push notifications
for new complaints, claims, status changes and reminders, plus e-mail alerts for registrations and account verification.
Filters
by date and status on every list.
Industries that can use Request Manage
Request Manage fits any organisation where staff report issues to a facilities or maintenance team, and where purchases need approval before they are made. Typical users:
Manufacturing plants and factories
machine breakdowns, shop-floor safety and housekeeping issues, and requests for spares and consumables.
Hospitals, clinics and diagnostic labs
ward cleanliness, equipment faults, and requests for medical and housekeeping supplies.
Hotels, resorts and restaurants
room and kitchen maintenance, housekeeping complaints, and food and amenity purchases.
Schools, colleges and universities
classroom, hostel, lab and canteen issues, and requests for stationery and lab equipment.
IT companies and corporate offices
facility, AC, electrical, network and cafeteria issues, and requests for laptops, accessories and office supplies.
Housing societies, commercial complexes and facility management companies
resident and tenant complaints handled by the maintenance staff.
Retail chains and shopping malls
store maintenance and cleanliness across branches, and purchase requests from each store.
Warehouses and logistics companies
equipment, vehicle and safety issues, and requests for packing material and spares.
Government offices and public institutions
transparent tracking of complaints and purchase approvals.
Construction and real estate firms
site issues and material purchase requests from site engineers.
Getting started
Every user, whatever their role, starts on these screens.
1
Get Started (registration)
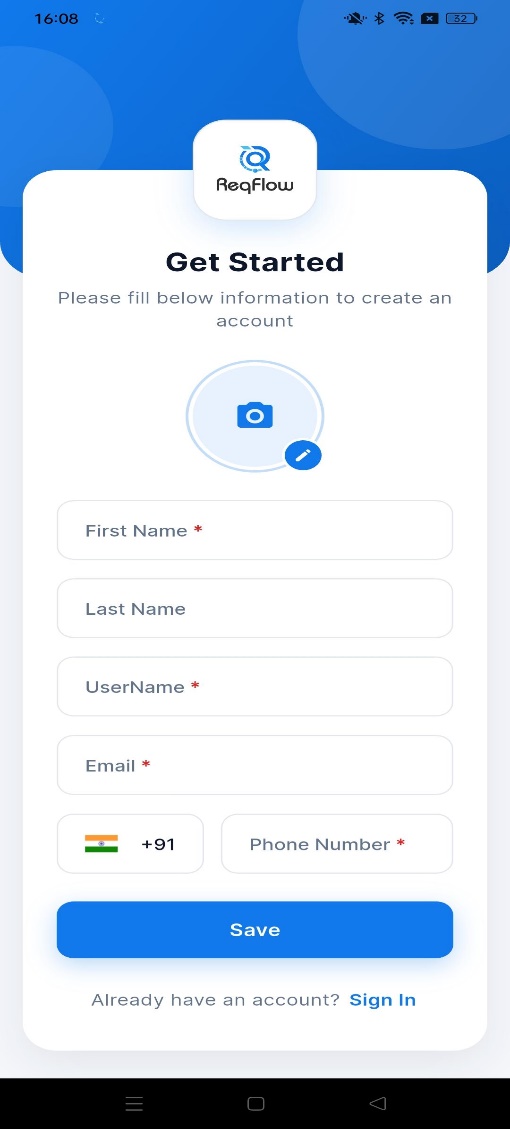
A new user creates their own account from this screen. They add a profile photo (optional), first and last name, a username, their e-mail address and their phone number with the country code.
After saving, the account waits for verification. An administrator checks and approves the new user from the admin panel, and the user receives an e-mail as soon as the account is verified.
Key points
Fields marked with * are required.
Users cannot sign in until their account is verified, which keeps unknown people out of the app.
The administrator is alerted by e-mail when someone registers.
2
Sign In
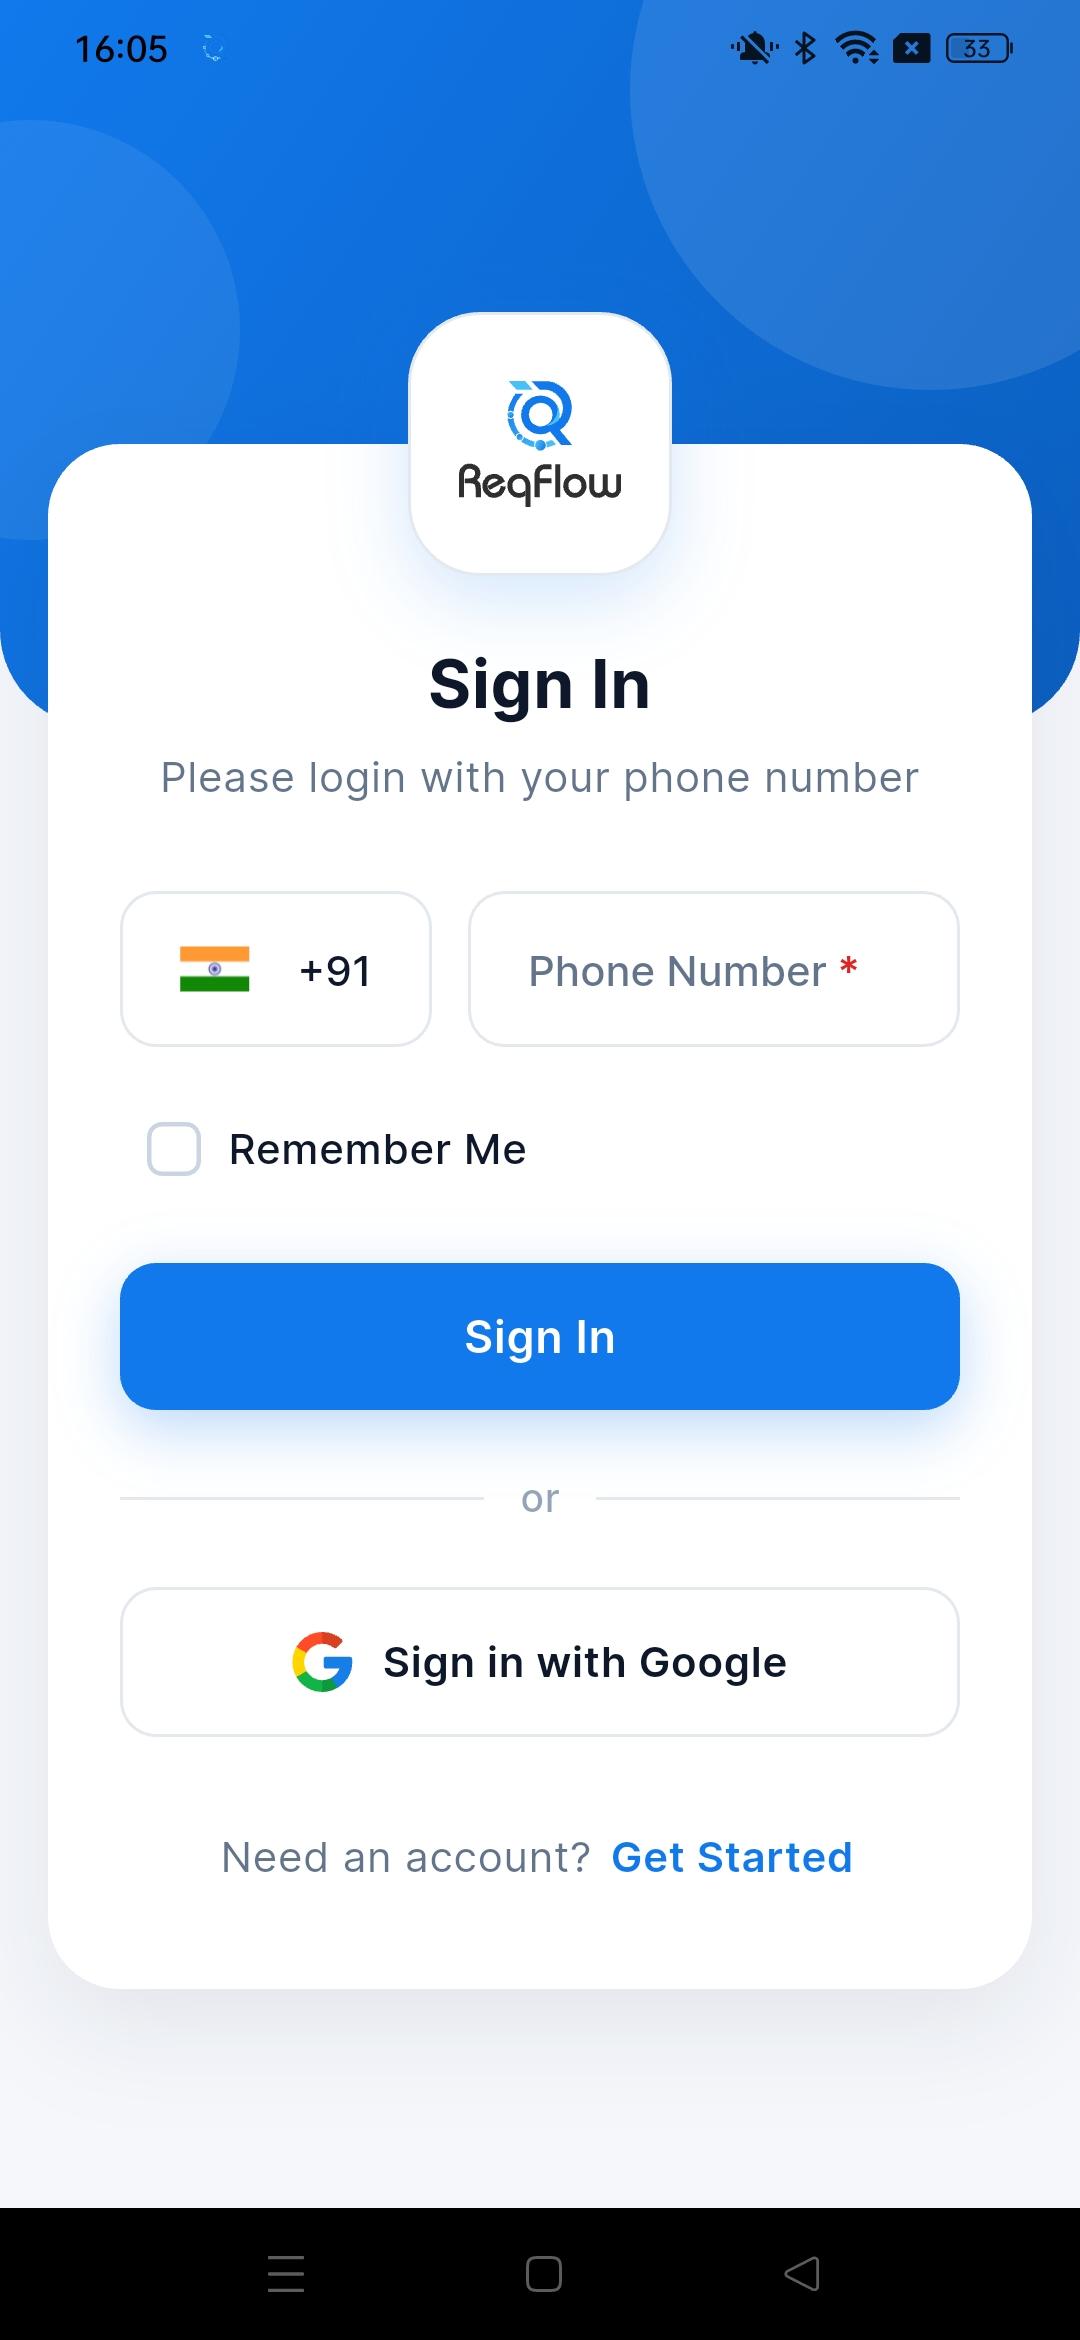
Users sign in with the phone number they registered with. No password needs to be remembered: a one-time code is sent to the phone.
They can also sign in with their Google account in one tap. "Remember Me" keeps them signed in on their own phone, and "Get Started" opens the registration screen for new users.
Key points
Phone number login with the +91 country code.
Sign in with Google as an alternative.
Each user sees only the screens allowed for their role after signing in.
3
Verify OTP
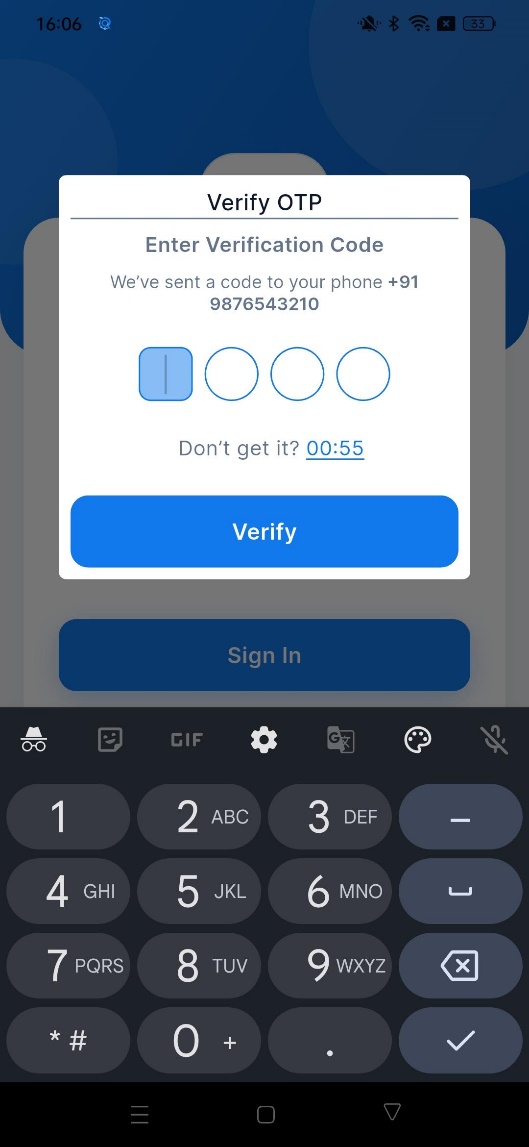
After the user taps Sign In, a 4-digit verification code (OTP) is sent to their phone number. The screen shows the number the code was sent to.
The user types the code and taps Verify to sign in. If the code does not arrive, a new one can be requested when the countdown timer ends.
Key points
The code is valid only for that phone number.
A wrong code is rejected and the attempt is recorded in the admin login report.
1
System Admin
Who
The owner or administrator of the organisation in the app.
Can do
Set up departments, complaint types and users; see all complaints and purchase requests; read and add attachments and comments.
1
System Admin menu
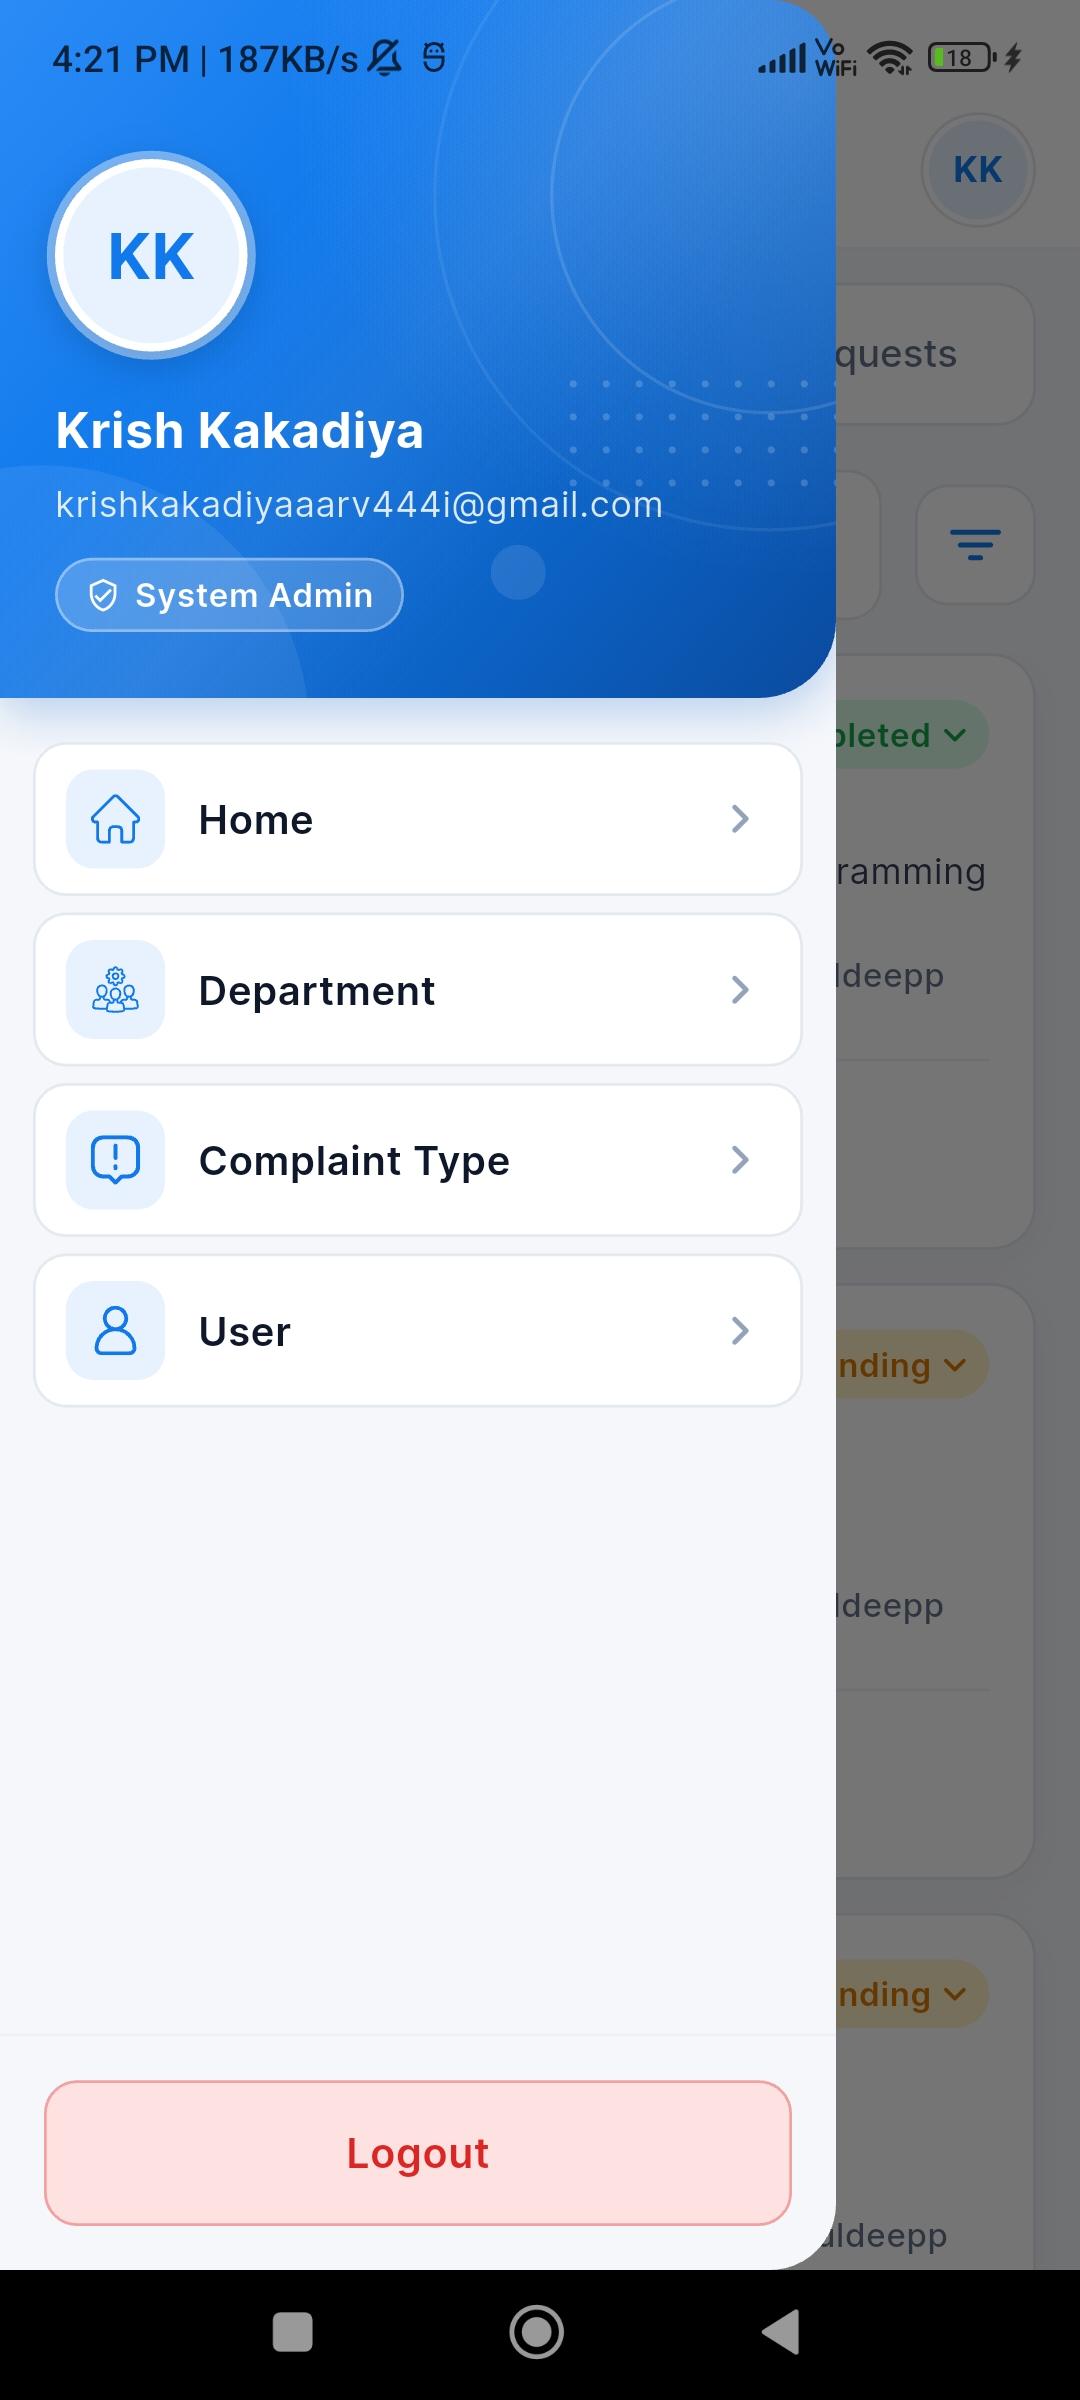
The side menu opens from the top-left corner. It shows the signed-in user's name, e-mail and role badge (System Admin).
The System Admin has the most options: Home (complaints and purchase requests), Department, Complaint Type and User. Logout is at the bottom.
Key points
Department, Complaint Type and User are the setup screens, available only to the System Admin.
Set up departments, complaint types and users first (the next three screens); then the team can start raising complaints.
2
Department
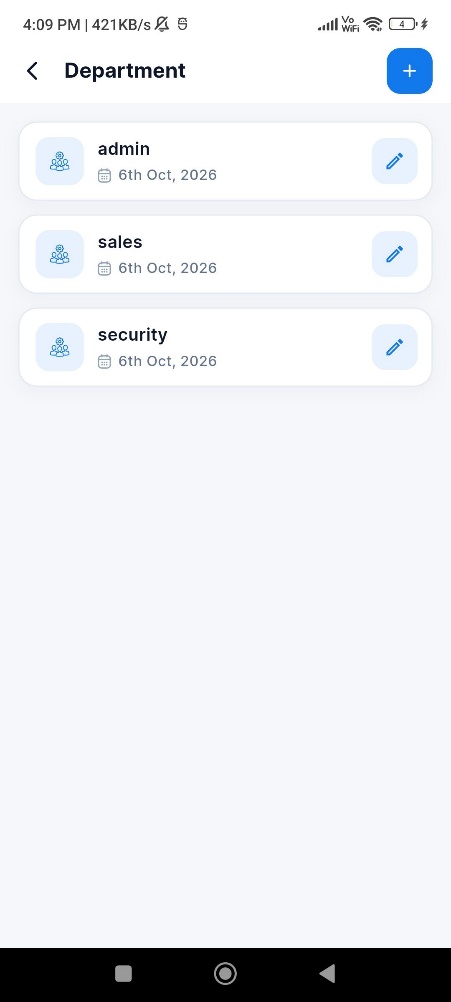
Here the System Admin creates the organisation's departments, for example admin, sales and security. Each department shows the date it was created.
Tap + at the top right to add a department and the pencil button to rename one. Users such as HODs are linked to these departments.
Key points
Departments decide which HOD is responsible for a user's complaints.
Set these up first, before adding users.
3
Complaint Type
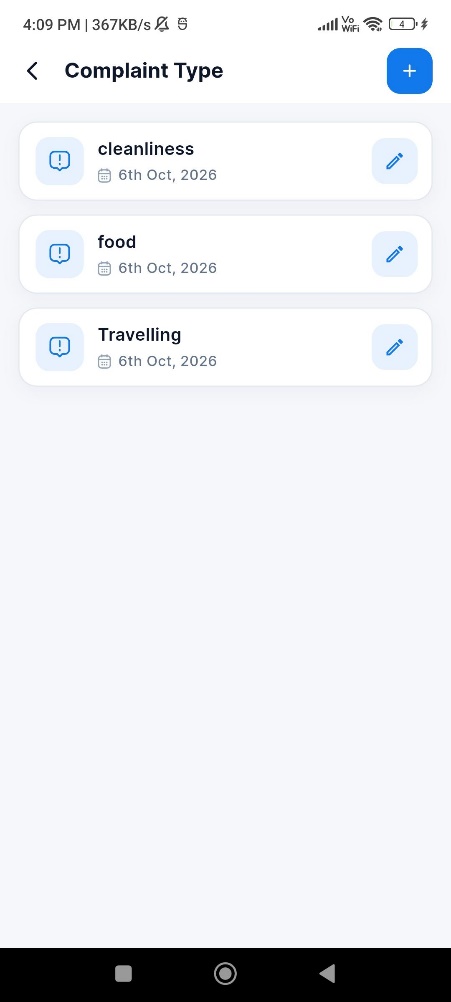
Complaint types are the categories a complaint belongs to, for example cleanliness, food and travelling. The System Admin adds them with + and edits them with the pencil button.
Maintenance users are linked to the complaint types they handle, so a cleanliness complaint reaches the cleaning team and a food complaint reaches the canteen team.
Key points
Users choose one of these types when they raise a complaint.
Add as many types as the organisation needs.
4
User
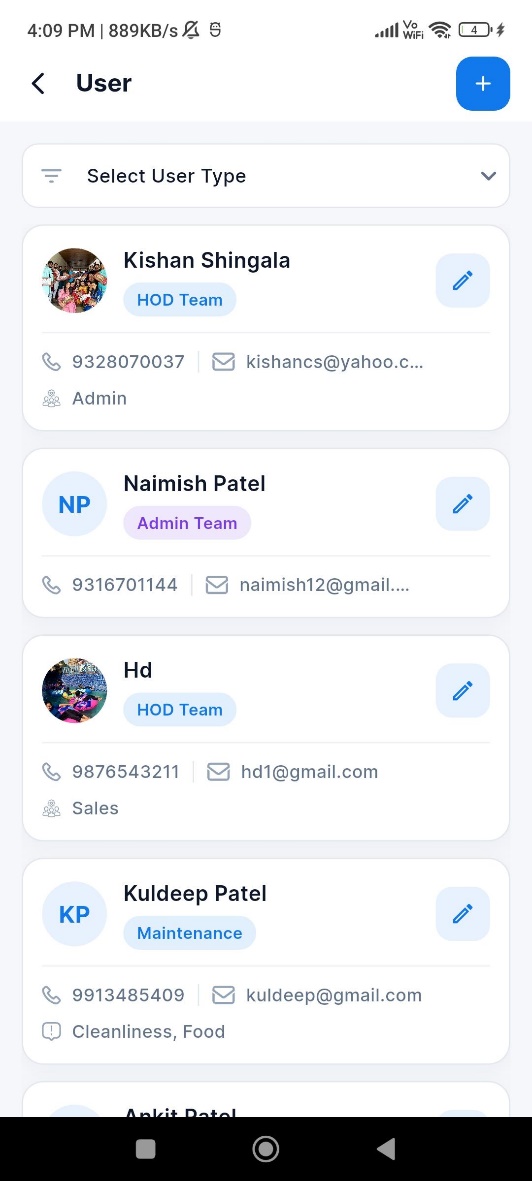
The System Admin adds and manages all users here. Each card shows the user's photo or initials, name, role badge (HOD Team, Admin Team, Maintenance or Operator), phone number and e-mail.
When adding a user, the System Admin chooses their role, which decides what they can see and do in the app. For HODs the card also shows their department, and for maintenance users the complaint types they handle (for example Cleanliness, Food). The pencil button edits a user and + adds a new one.
Key points
Add new Admin, HOD, Maintenance, and Operator users directly from this screen.
HOD Team: head of a department. Manages the department's complaints, changes their status and raises purchase requests. Choose their department when adding them.
Admin Team: office or administration staff. Sees all complaints and purchase requests and follows up on them.
Maintenance: technicians who fix issues. Choose the complaint types they handle; they see and claim only those complaints.
Operator: staff who report issues. Raises complaints and follows them until they are resolved.
Filter the list by role with "Select User Type".
5
Complaints list
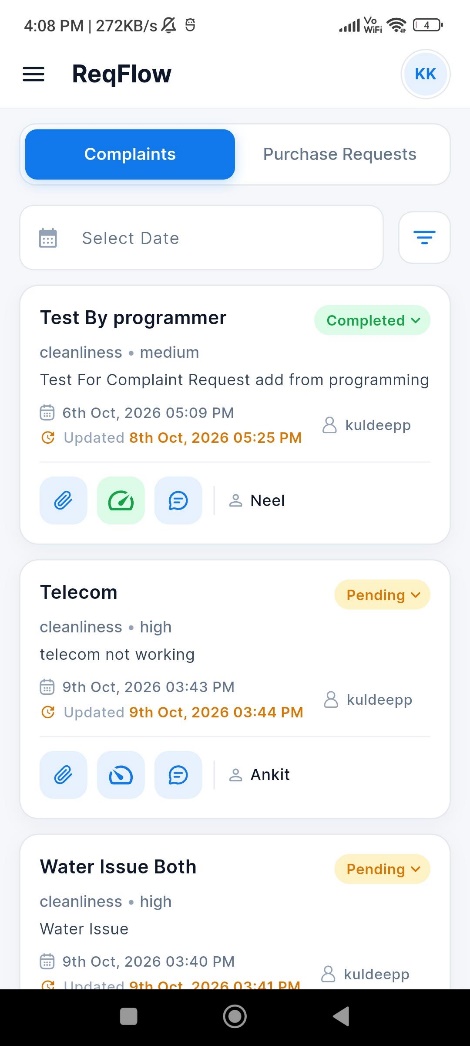
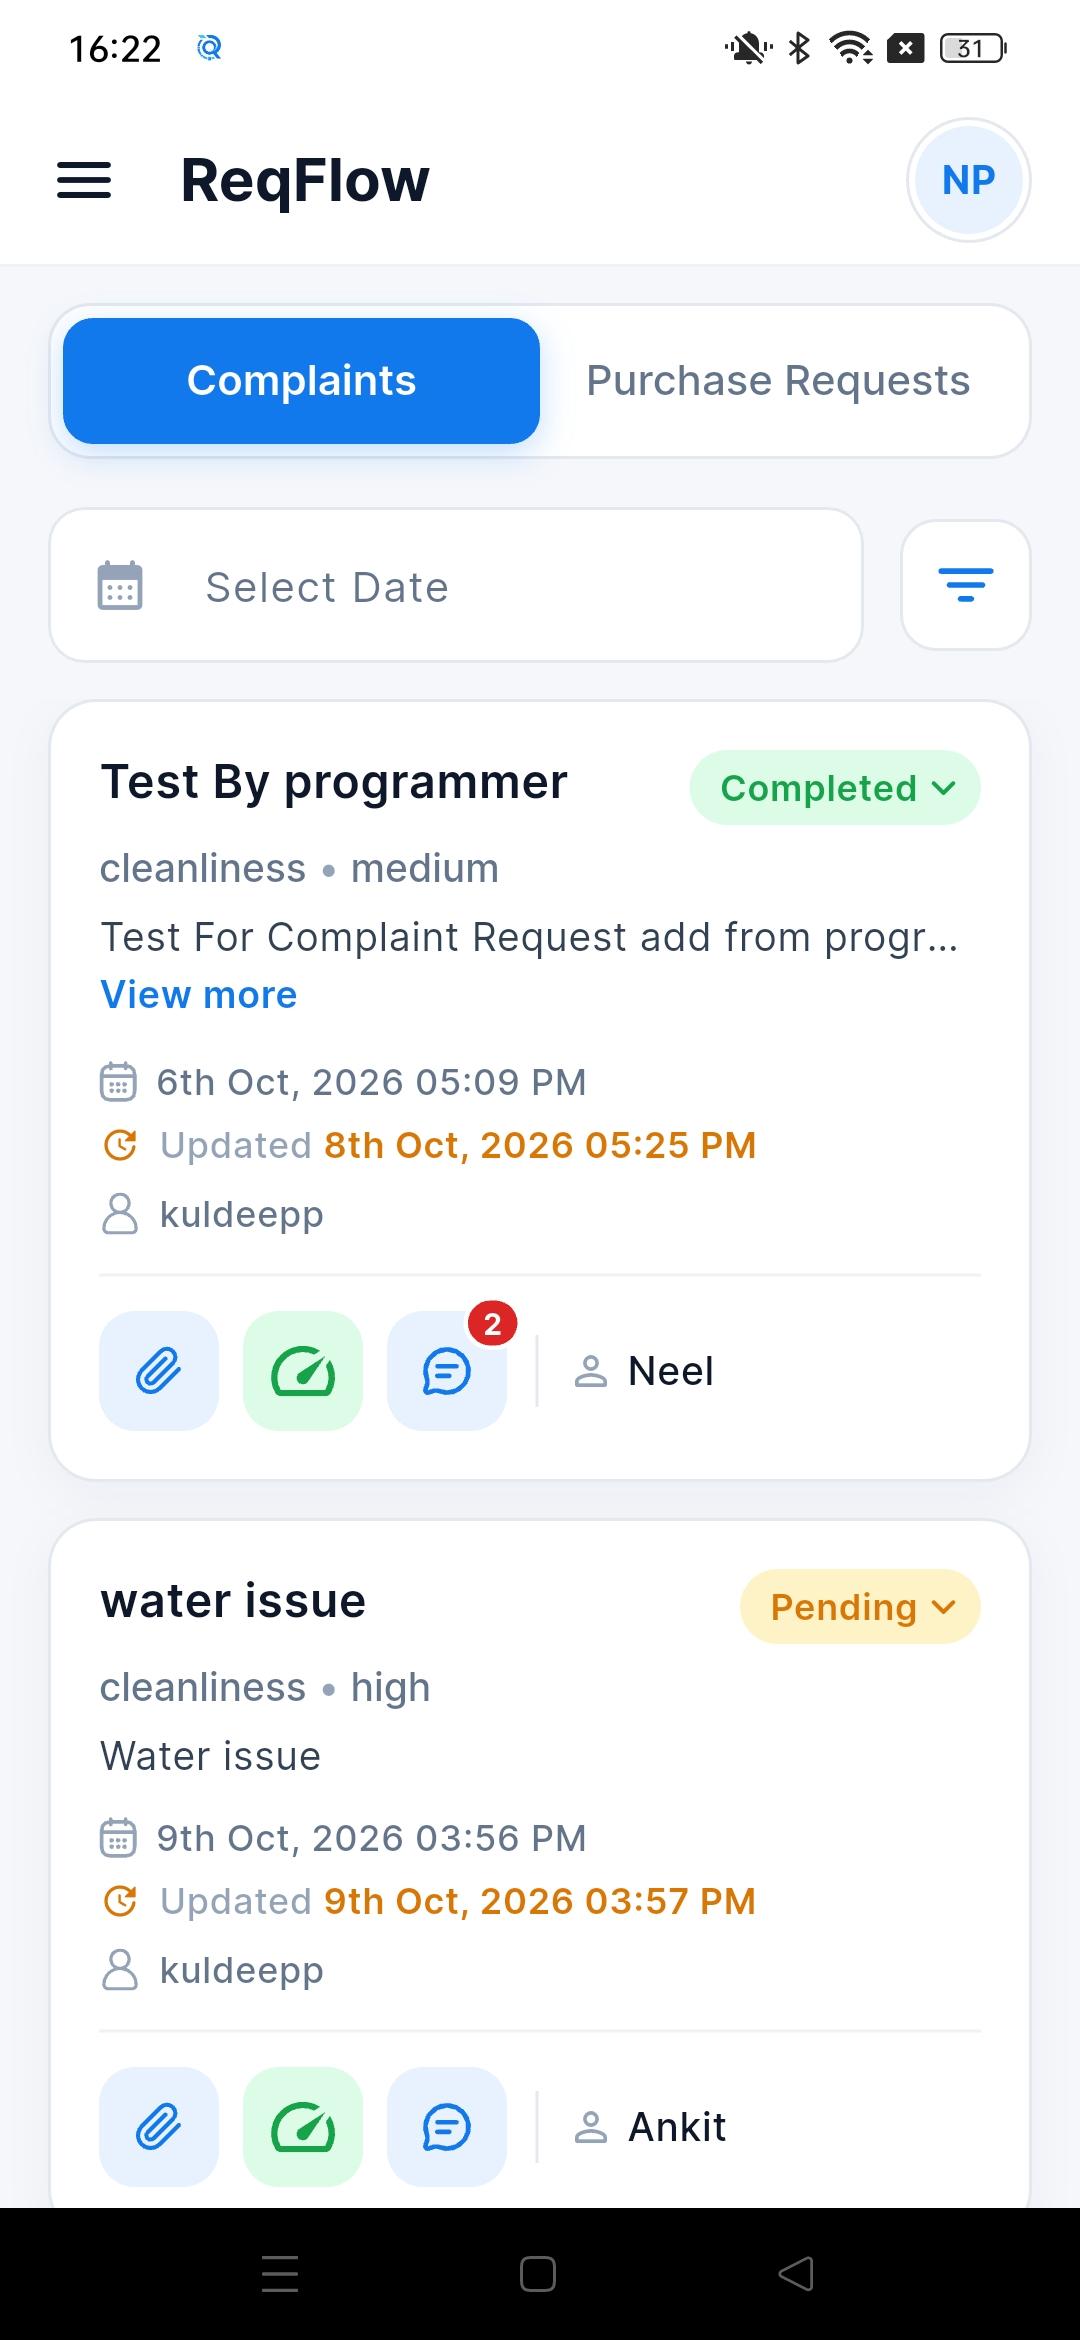
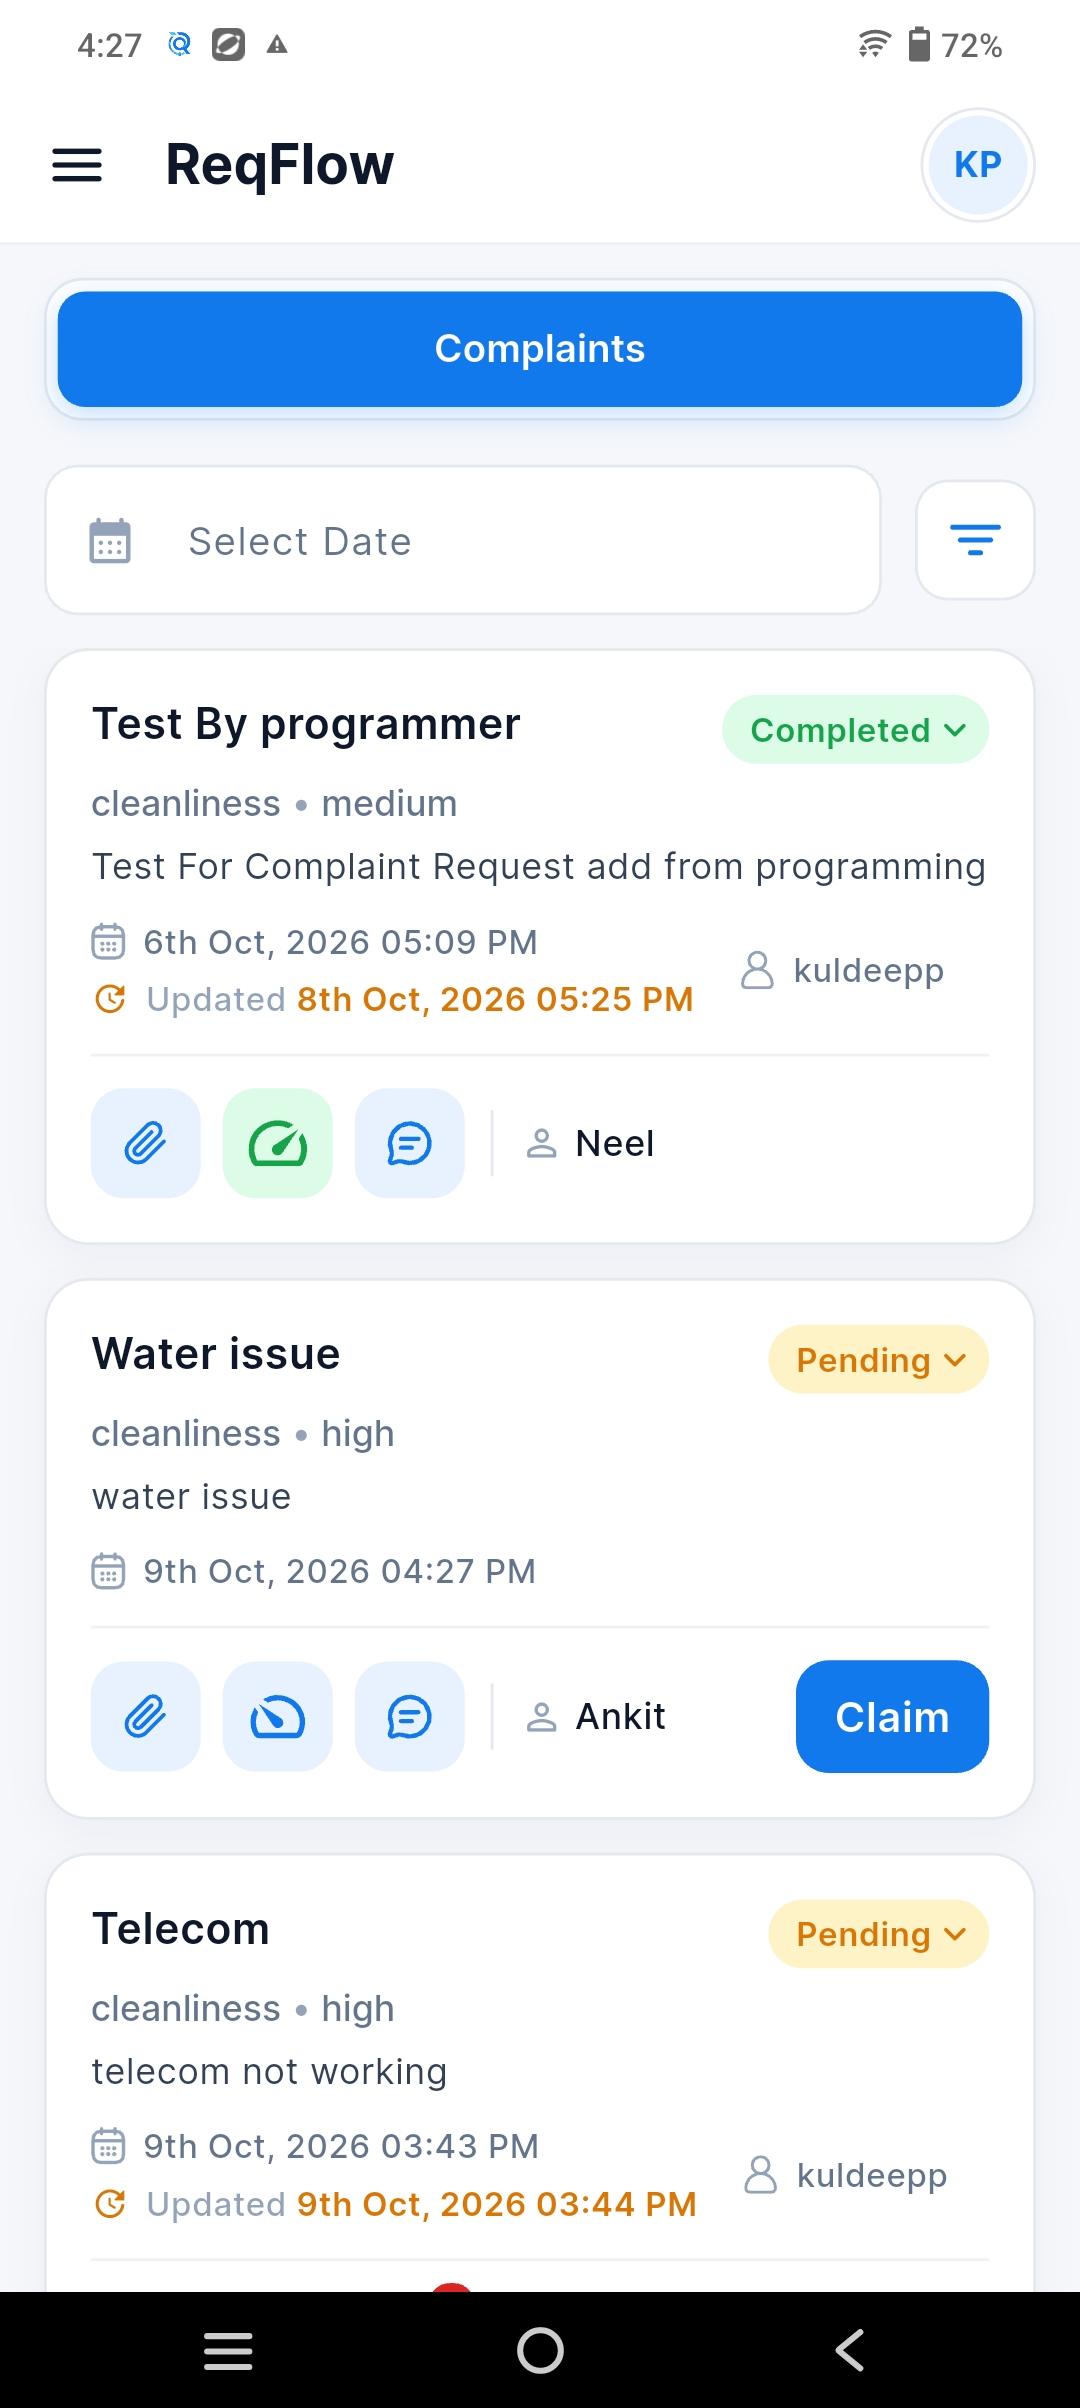
The Home screen shows every complaint in the organisation as a card. Each card shows the title, complaint type, priority, description, when it was created and last updated, the maintenance user who claimed it and the person who raised it.
The coloured status at the top right shows where each complaint stands: Pending (yellow), In Progress (blue), Completed (green) and so on. The buttons at the bottom of each card open attachments, send an urgent reminder and open the comments.
Key points
Switch between Complaints and Purchase Requests with the tabs at the top.
Filter the list by date with "Select Date" and by status with the filter button.
The reminder button sends an urgent reminder to everyone responsible for the complaint.
6
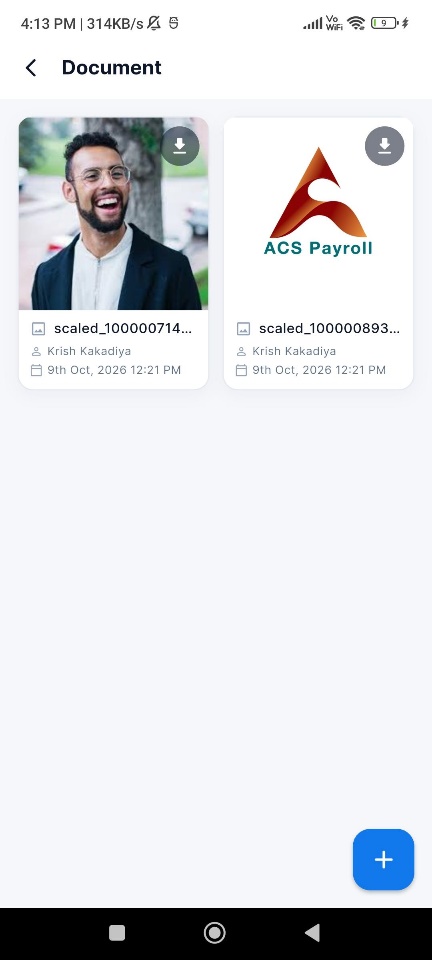
Documents (attachments)
Tapping the paperclip on a complaint opens its documents: photos of the problem, bills, reports or any other files.
Each file shows its name, who uploaded it and when. Any file can be downloaded with the download button, and the + button adds a new photo or document.
Key points
Photos make it easy for maintenance staff to understand the problem before they arrive.
All files stay attached to the complaint as a permanent record.
7
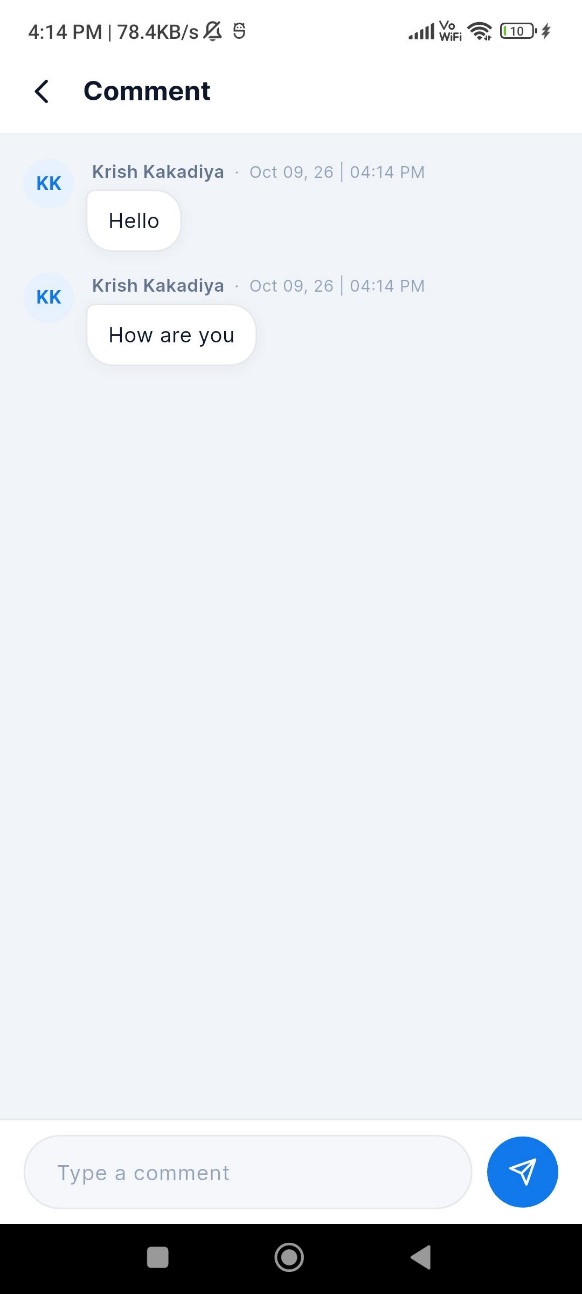
Comments
Every complaint has its own comment thread, like a chat. The person who raised it, the HOD, the admin team and the maintenance user can discuss the issue here instead of on calls or WhatsApp.
Each message shows the sender's name, the date and the time. New messages show as a red unread count on the comment button of the complaint card.
Key points
Everyone involved is notified of new comments.
The full conversation is saved with the complaint for future reference.
8
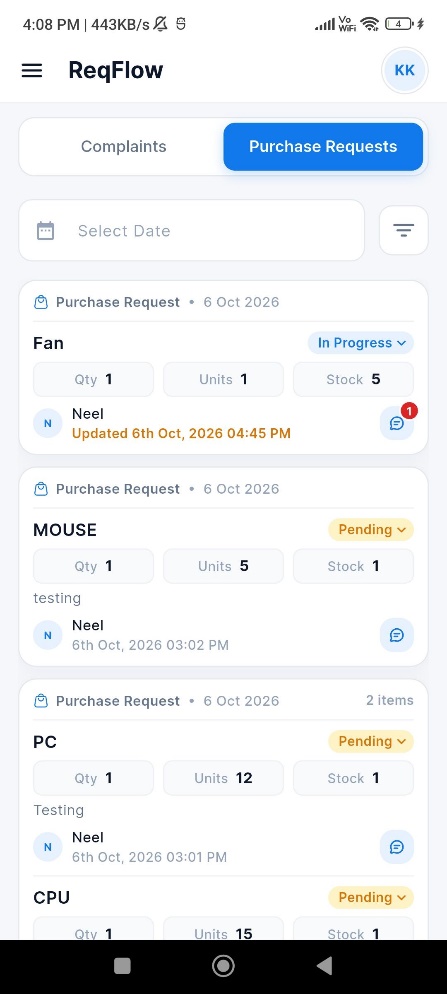
Purchase Requests list
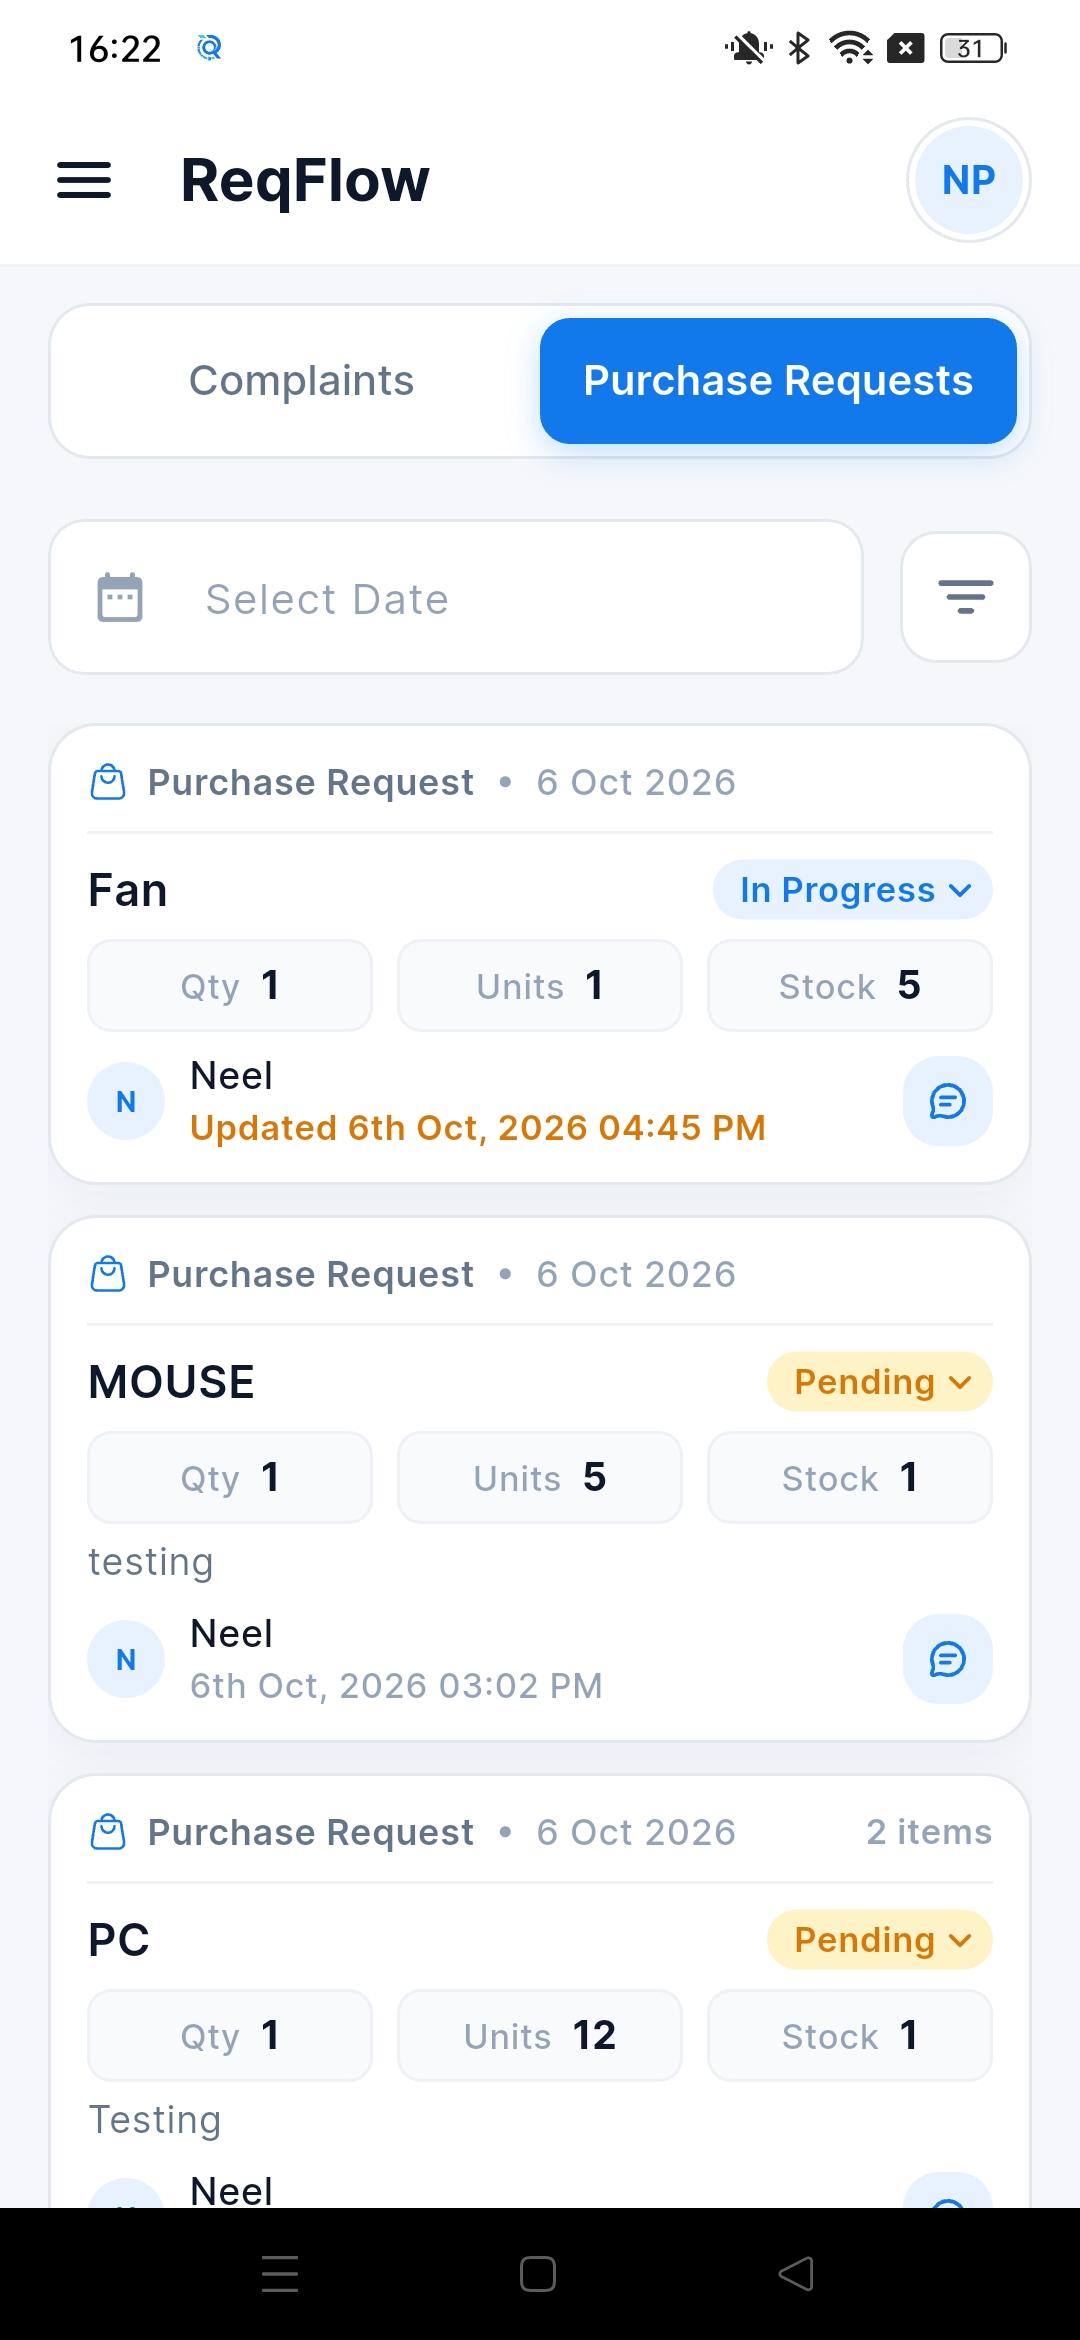
The Purchase Requests tab shows every request to buy items. Each request shows the date, the item name, the quantity, the unit, the current stock, any remarks, who raised it and its status (Pending or In Progress, for example).
Requests with several items show the item count (for example "2 items"). Each request also has its own comment thread for questions about the purchase.
Key points
Current stock helps decide whether the purchase is really needed.
Requests can be filtered by date and status like complaints.
2
Admin Team
Who
Office or administration staff who oversee day-to-day requests.
Can do
View and follow up on all complaints and purchase requests, raise complaints, and take part in comments.
1
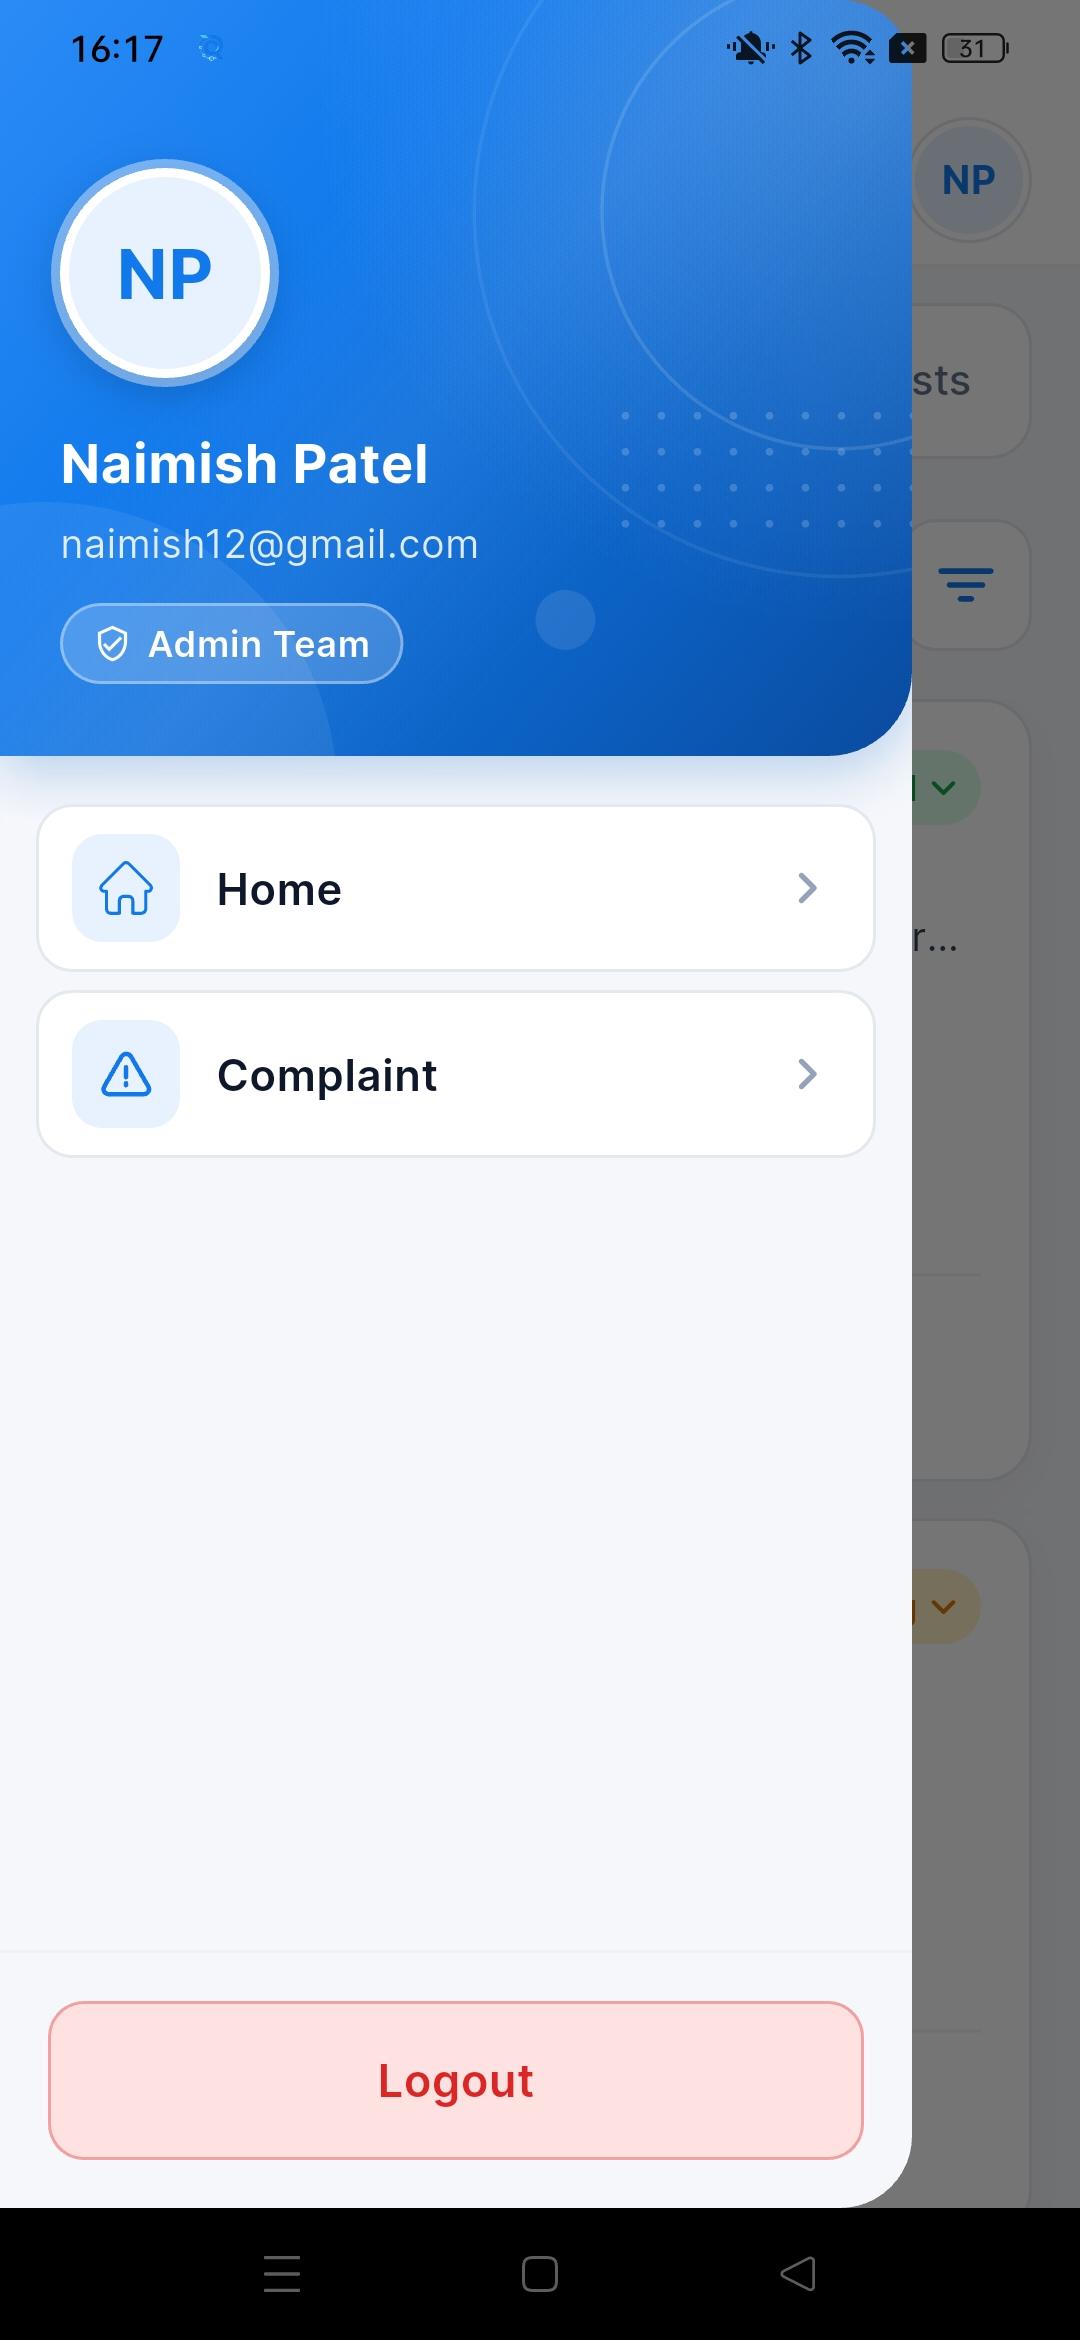
Admin Team menu
The Admin Team menu shows the user's name, e-mail and the Admin Team badge, with Home and Complaint.
The setup screens (Department, Complaint Type and User) are not shown, because only the System Admin manages them.
Key points
Home shows complaints and purchase requests.
Complaint opens the form to raise a new complaint.
2
Complaints
The admin team sees all complaints with their status, type, priority, dates, the person who raised them and the maintenance user who claimed them.
The red badge on the comment button shows how many unread messages there are, and "View more" expands a long description. This lets the admin team spot delays and follow up quickly.
Key points
Complaints that stay Pending for long can be escalated with an urgent reminder.
The admin team is notified when complaints are raised, claimed or updated.
3
Add Complaint
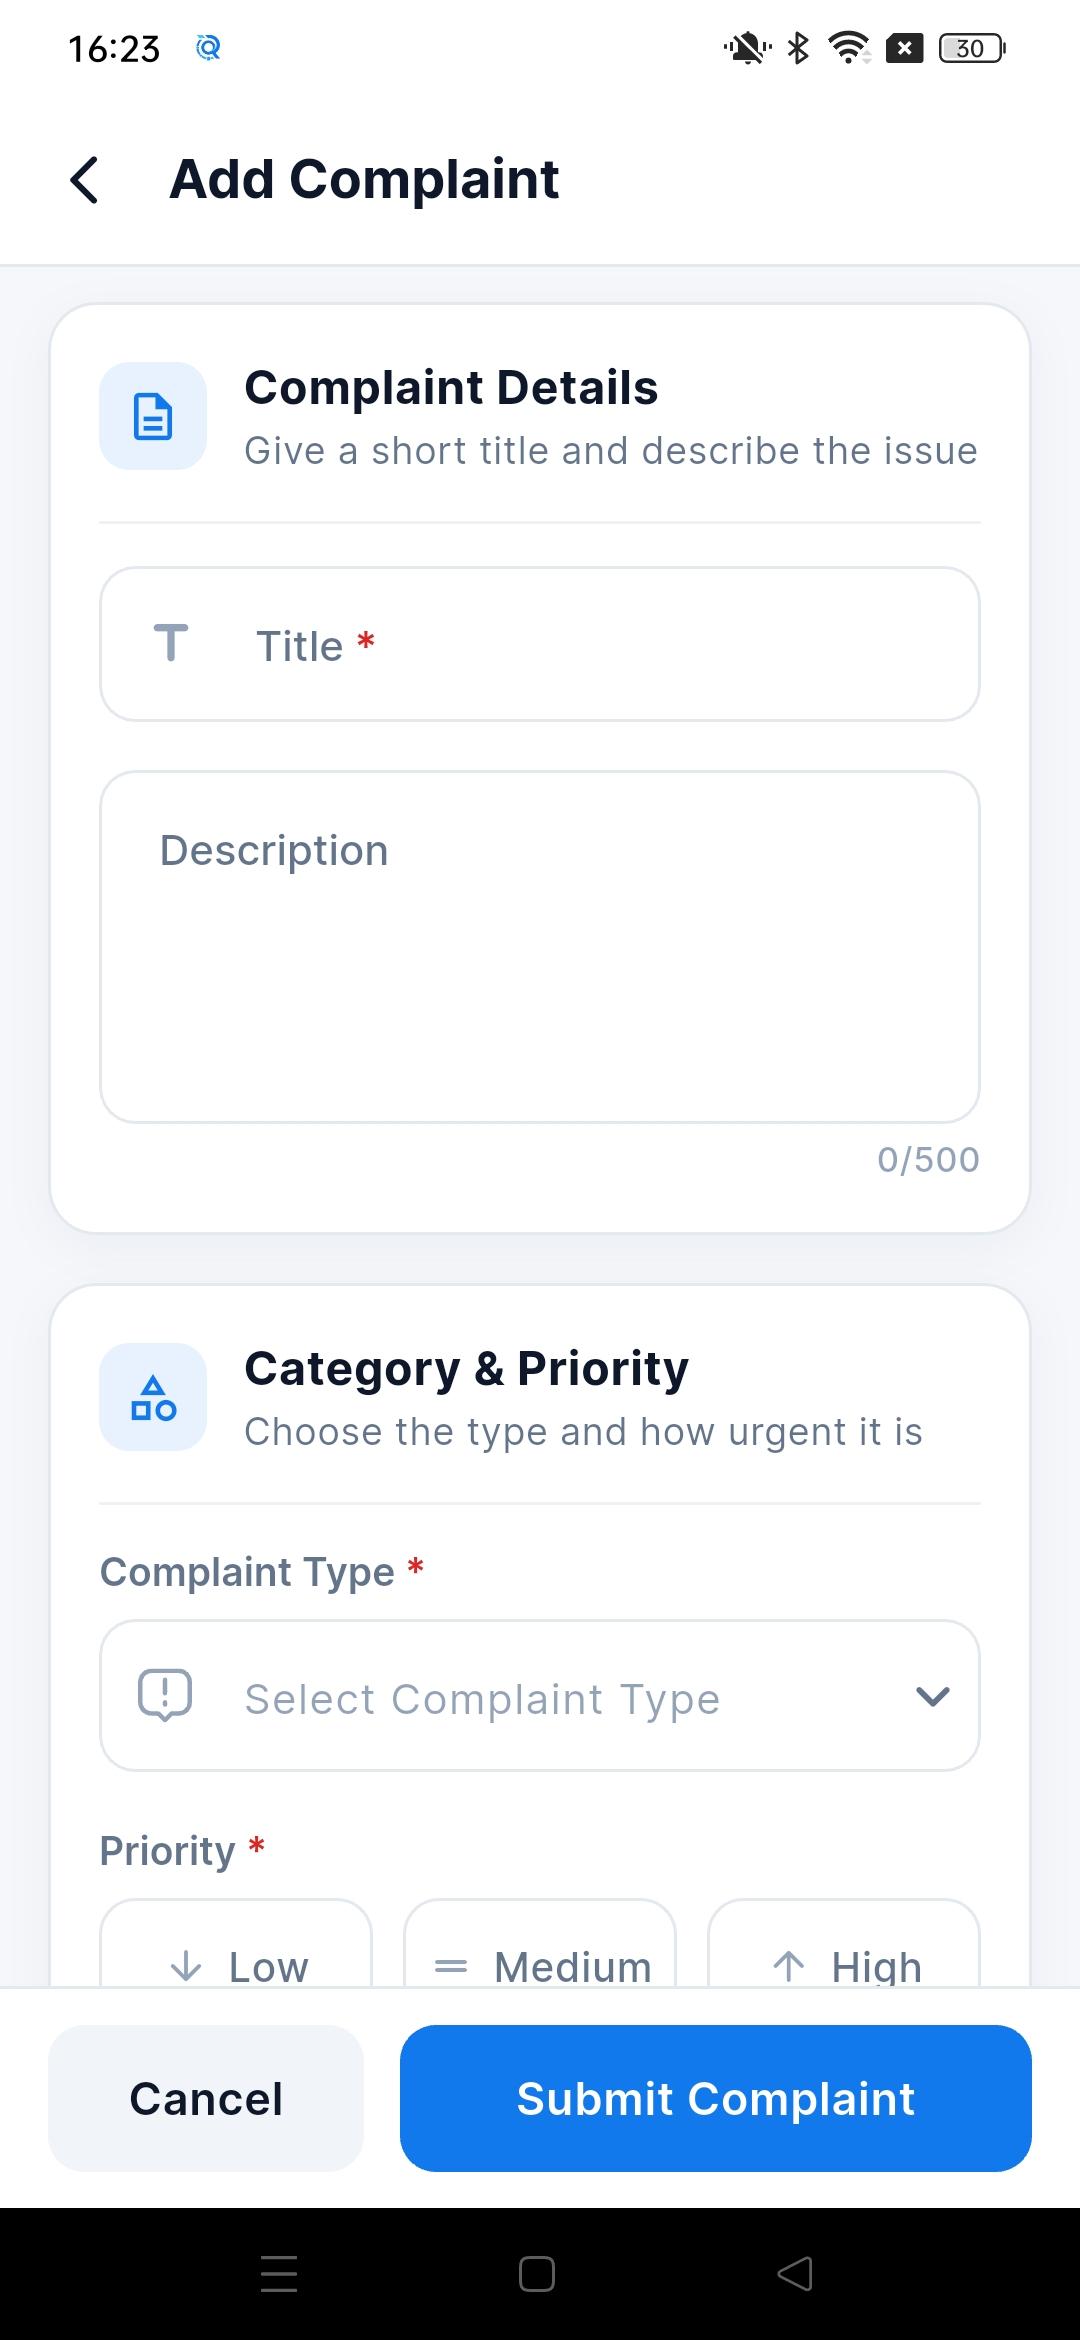
The admin team uses this form to report a new issue. The form has two parts: Complaint Details (a short title and a description of up to 500 characters) and Category & Priority (the complaint type and how urgent it is).
When the complaint is submitted, it starts as Pending and the people responsible are notified on their phones straight away. The admin team can raise complaints for issues they notice themselves.
Key points
Title, complaint type and priority are required; the description is optional.
Priority can be Low, Medium or High, so urgent issues stand out in every list.
The complaint type decides which maintenance users can see and claim it.
4
Purchase Requests
The admin team sees every purchase request with the items, quantity, unit, current stock, remarks, status and the person who raised it.
They can follow up on pending requests and discuss details in each request's comment thread, for example to confirm quantities or suppliers.
Key points
The status shows whether a request is Pending, In Progress or done.
Unread comment counts show which requests have new questions.
3
HOD (Head of Department)
Who
The head of a department.
Can do
Manage their department's complaints, change their status, raise complaints and raise purchase requests.
1
HOD menu
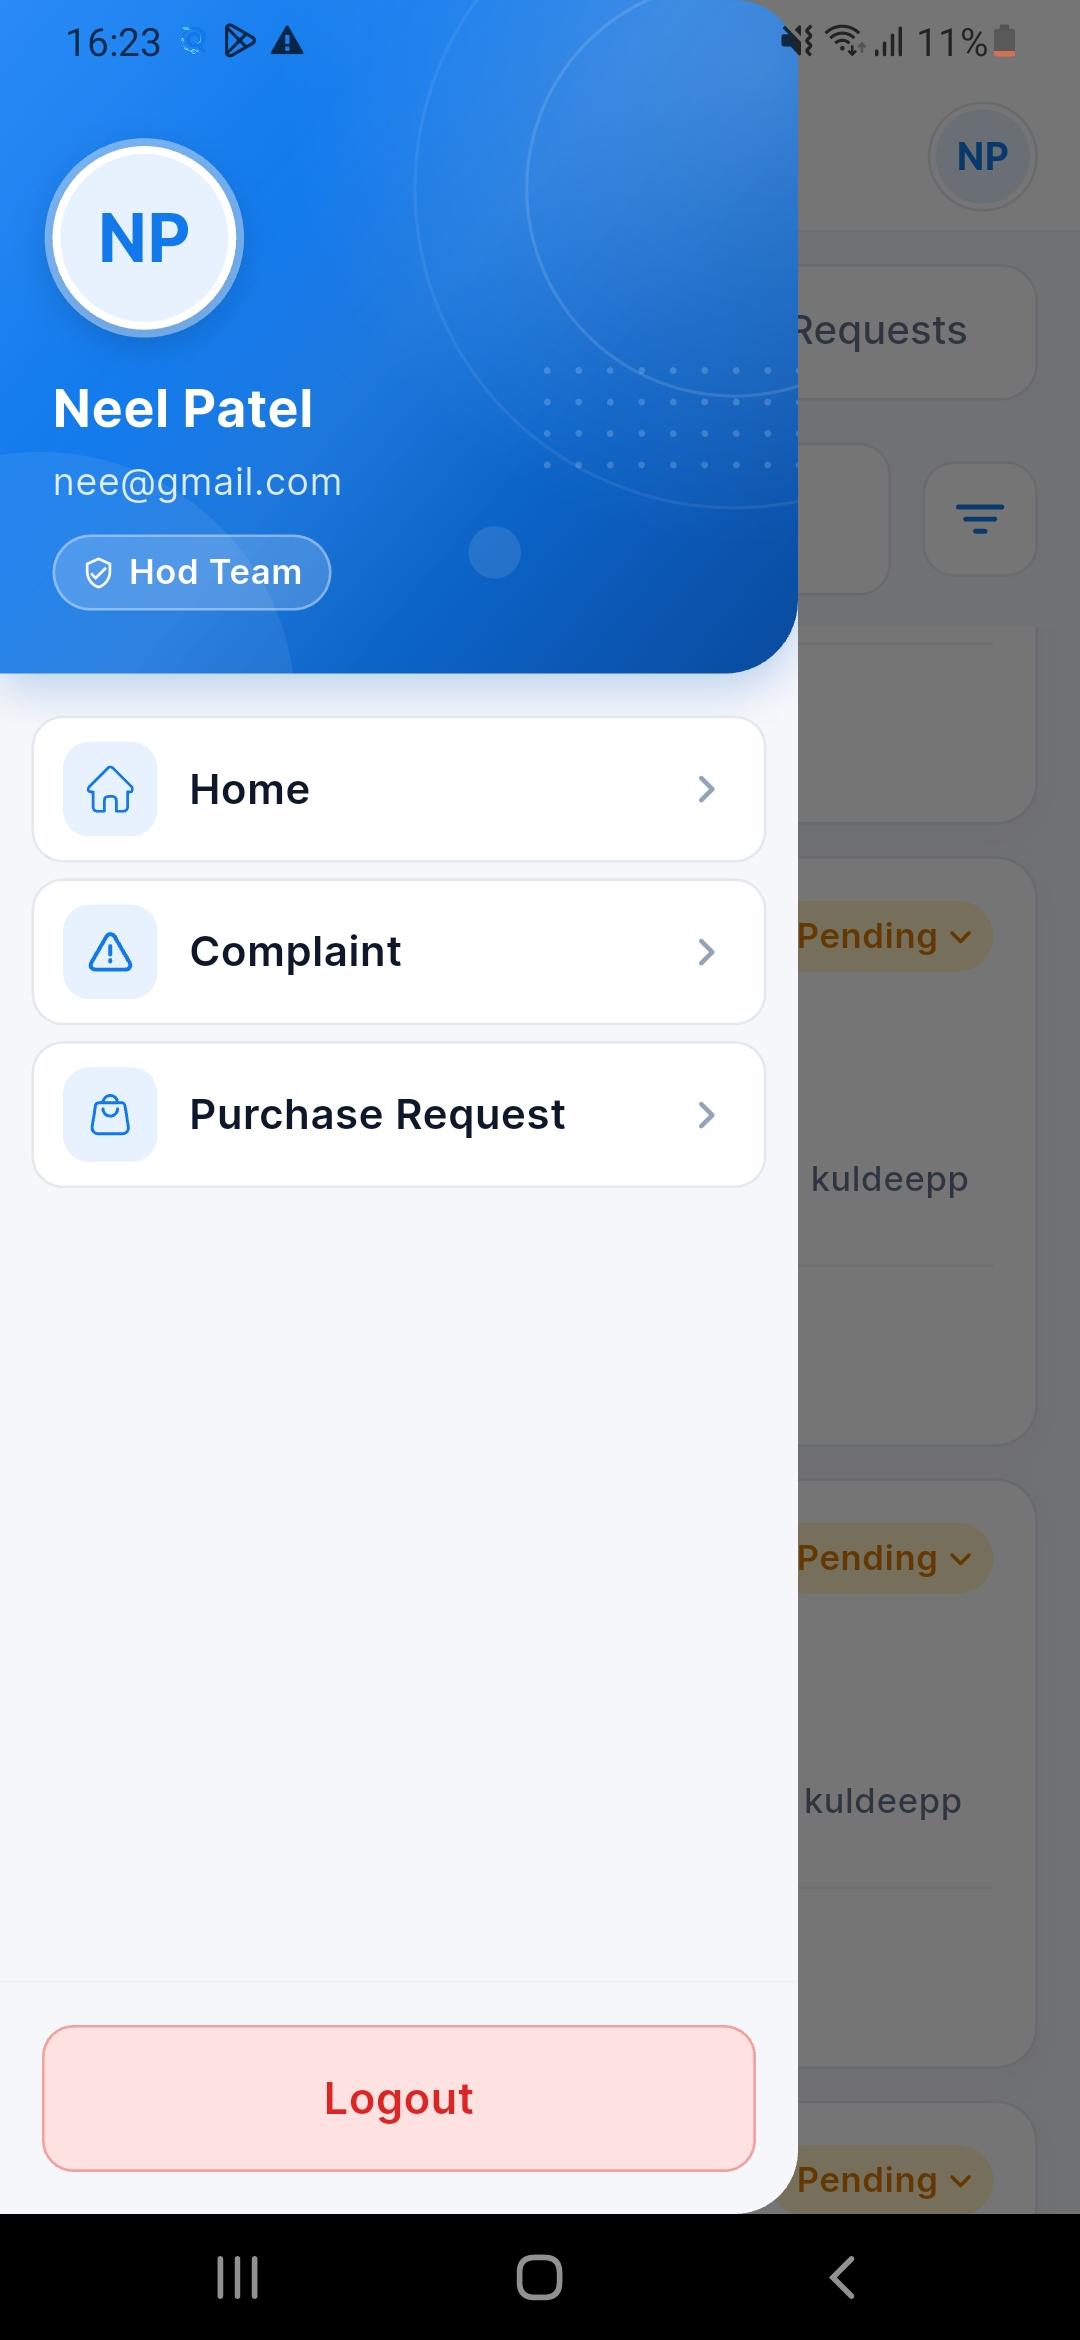
The HOD (Head of Department) menu shows the user's name, e-mail and the HOD Team badge, with Home, Complaint and Purchase Request.
The HOD can both raise complaints and request purchases for their department.
Key points
Purchase Request opens the form to request items.
Home lists the department's complaints and purchase requests.
2
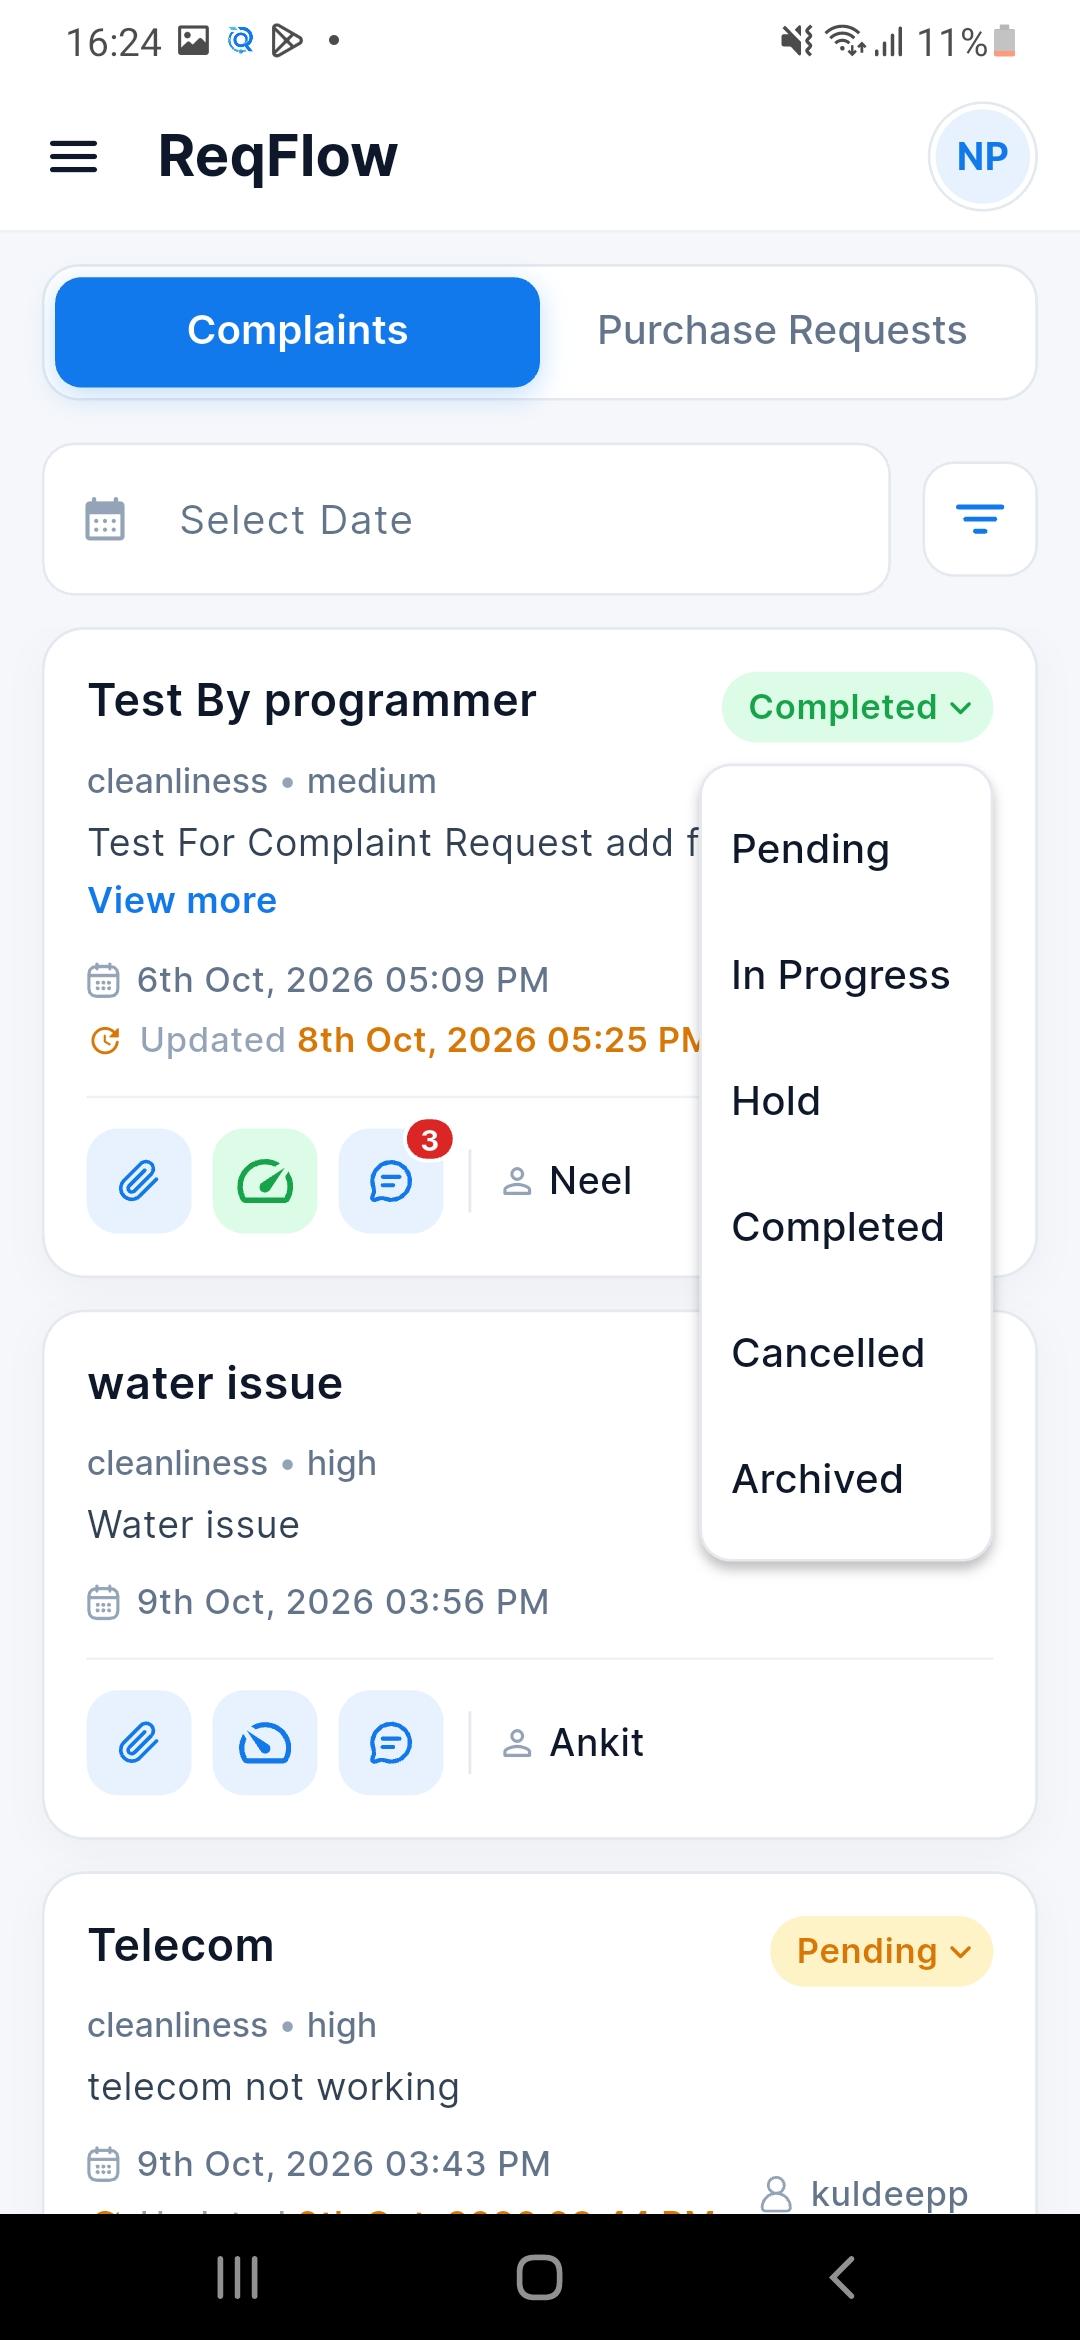
Change complaint status
The HOD can update a complaint by tapping its status. A list opens with all statuses: Pending, In Progress, Hold, Completed, Cancelled and Archived.
Choosing a new status updates the complaint at once, and the person who raised it, the maintenance user and the admin team are notified.
Key points
Hold pauses a complaint, for example while waiting for parts.
Archived is for old complaints that no longer need any attention.
The "Updated" time on the card shows when the status last changed.
3
Add Complaint
The HOD uses this form to report a new issue. The form has two parts: Complaint Details (a short title and a description of up to 500 characters) and Category & Priority (the complaint type and how urgent it is).
When the complaint is submitted, it starts as Pending and the people responsible are notified on their phones straight away. The HOD can report issues on behalf of their department.
Key points
Title, complaint type and priority are required; the description is optional.
Priority can be Low, Medium or High, so urgent issues stand out in every list.
The complaint type decides which maintenance users can see and claim it.
4
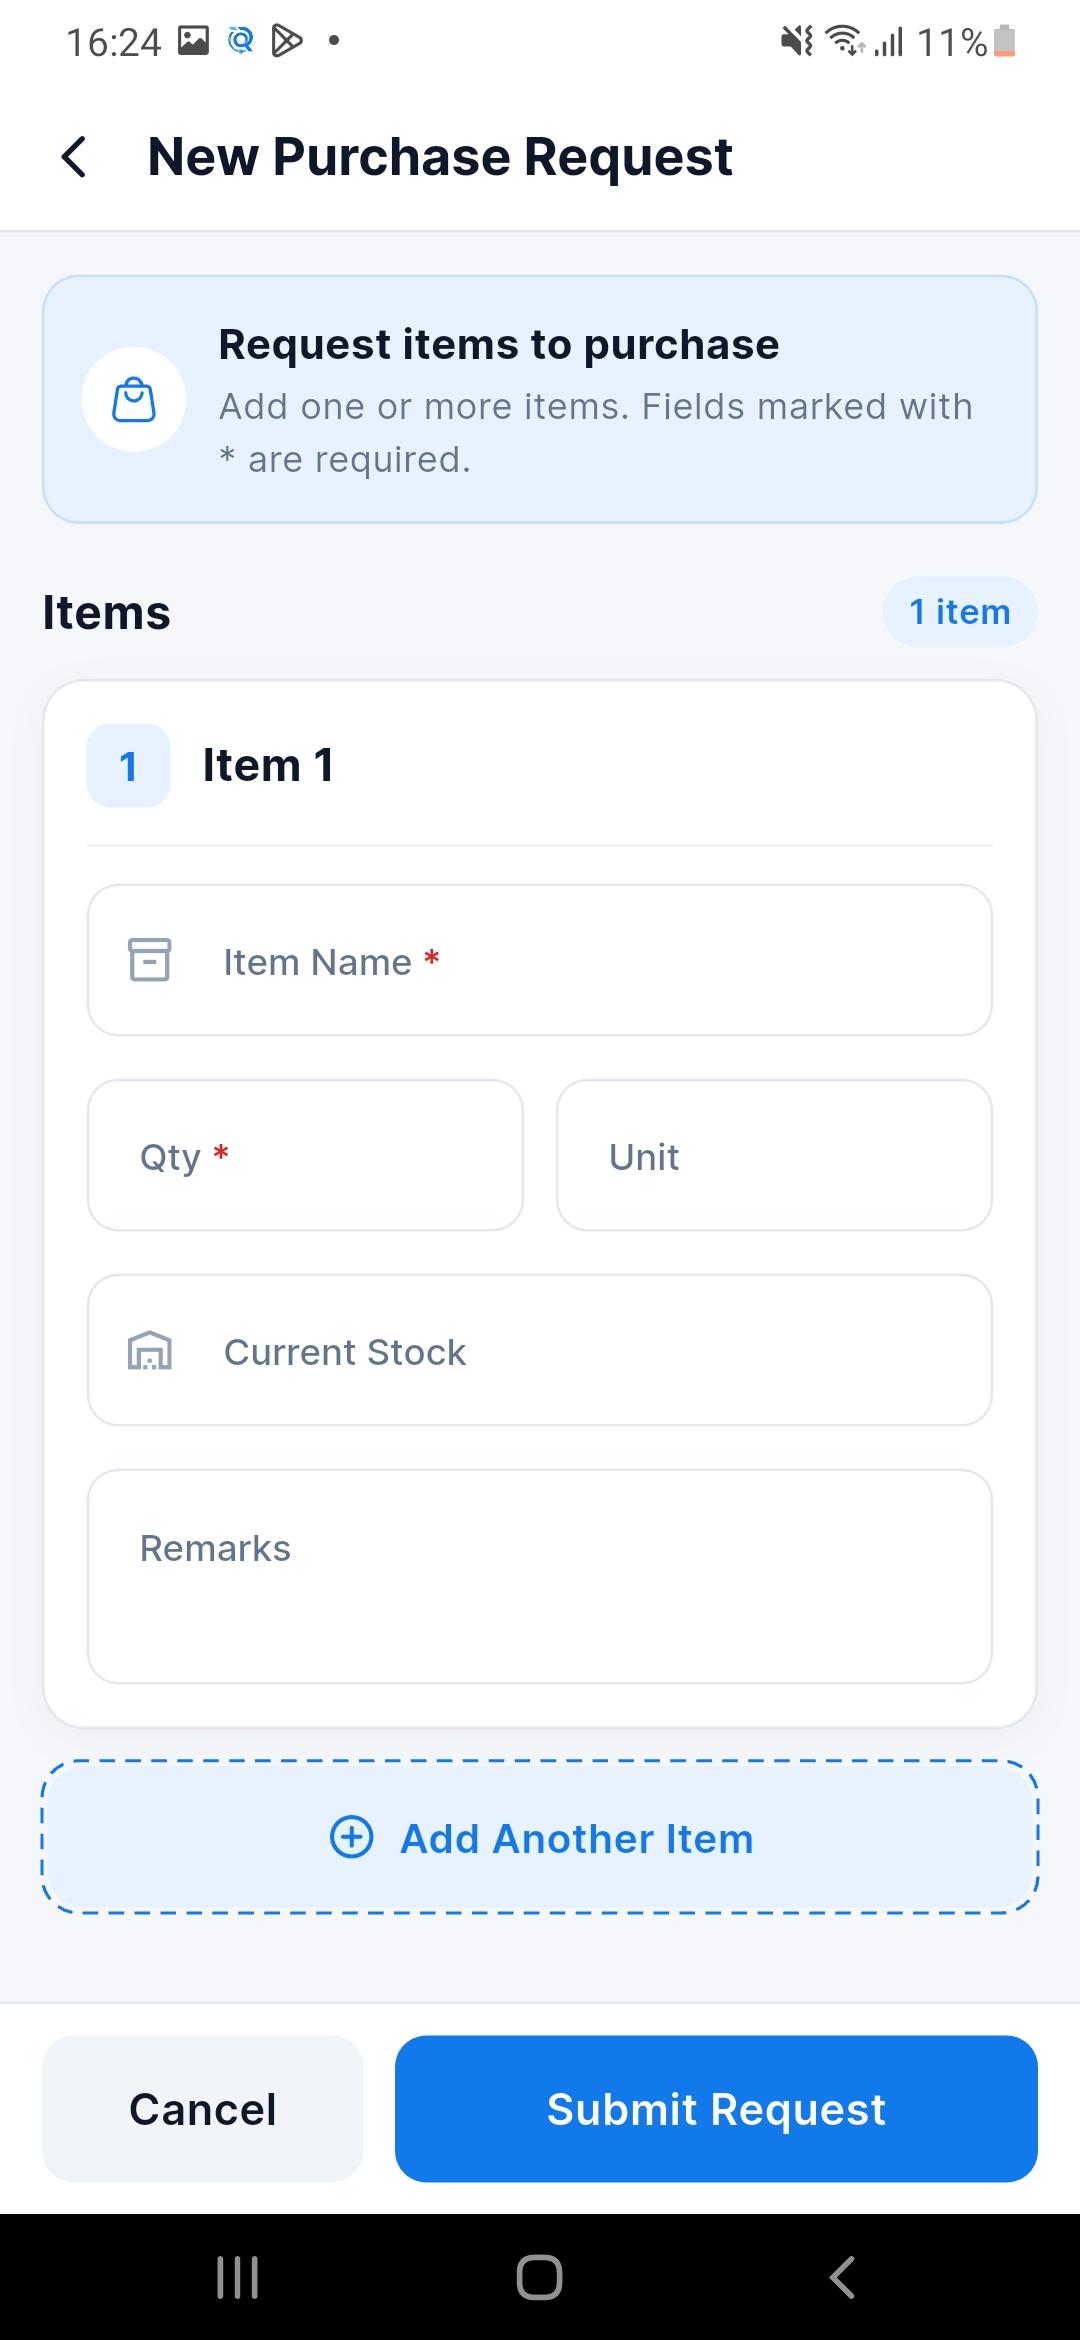
New Purchase Request
The HOD requests items to buy with this form. Each item has a name, quantity, unit (for example pieces or kg), current stock and remarks.
"Add Another Item" adds more items to the same request, so a department can ask for several things at once. Submit Request sends it for approval.
Key points
Item name and quantity are required.
Entering the current stock helps the approver decide quickly.
The request and its status can then be followed in the Purchase Requests tab.
4
Operator
Who
Staff members who report issues.
Can do
Raise complaints, follow their progress, add attachments and comments, and send urgent reminders.
1
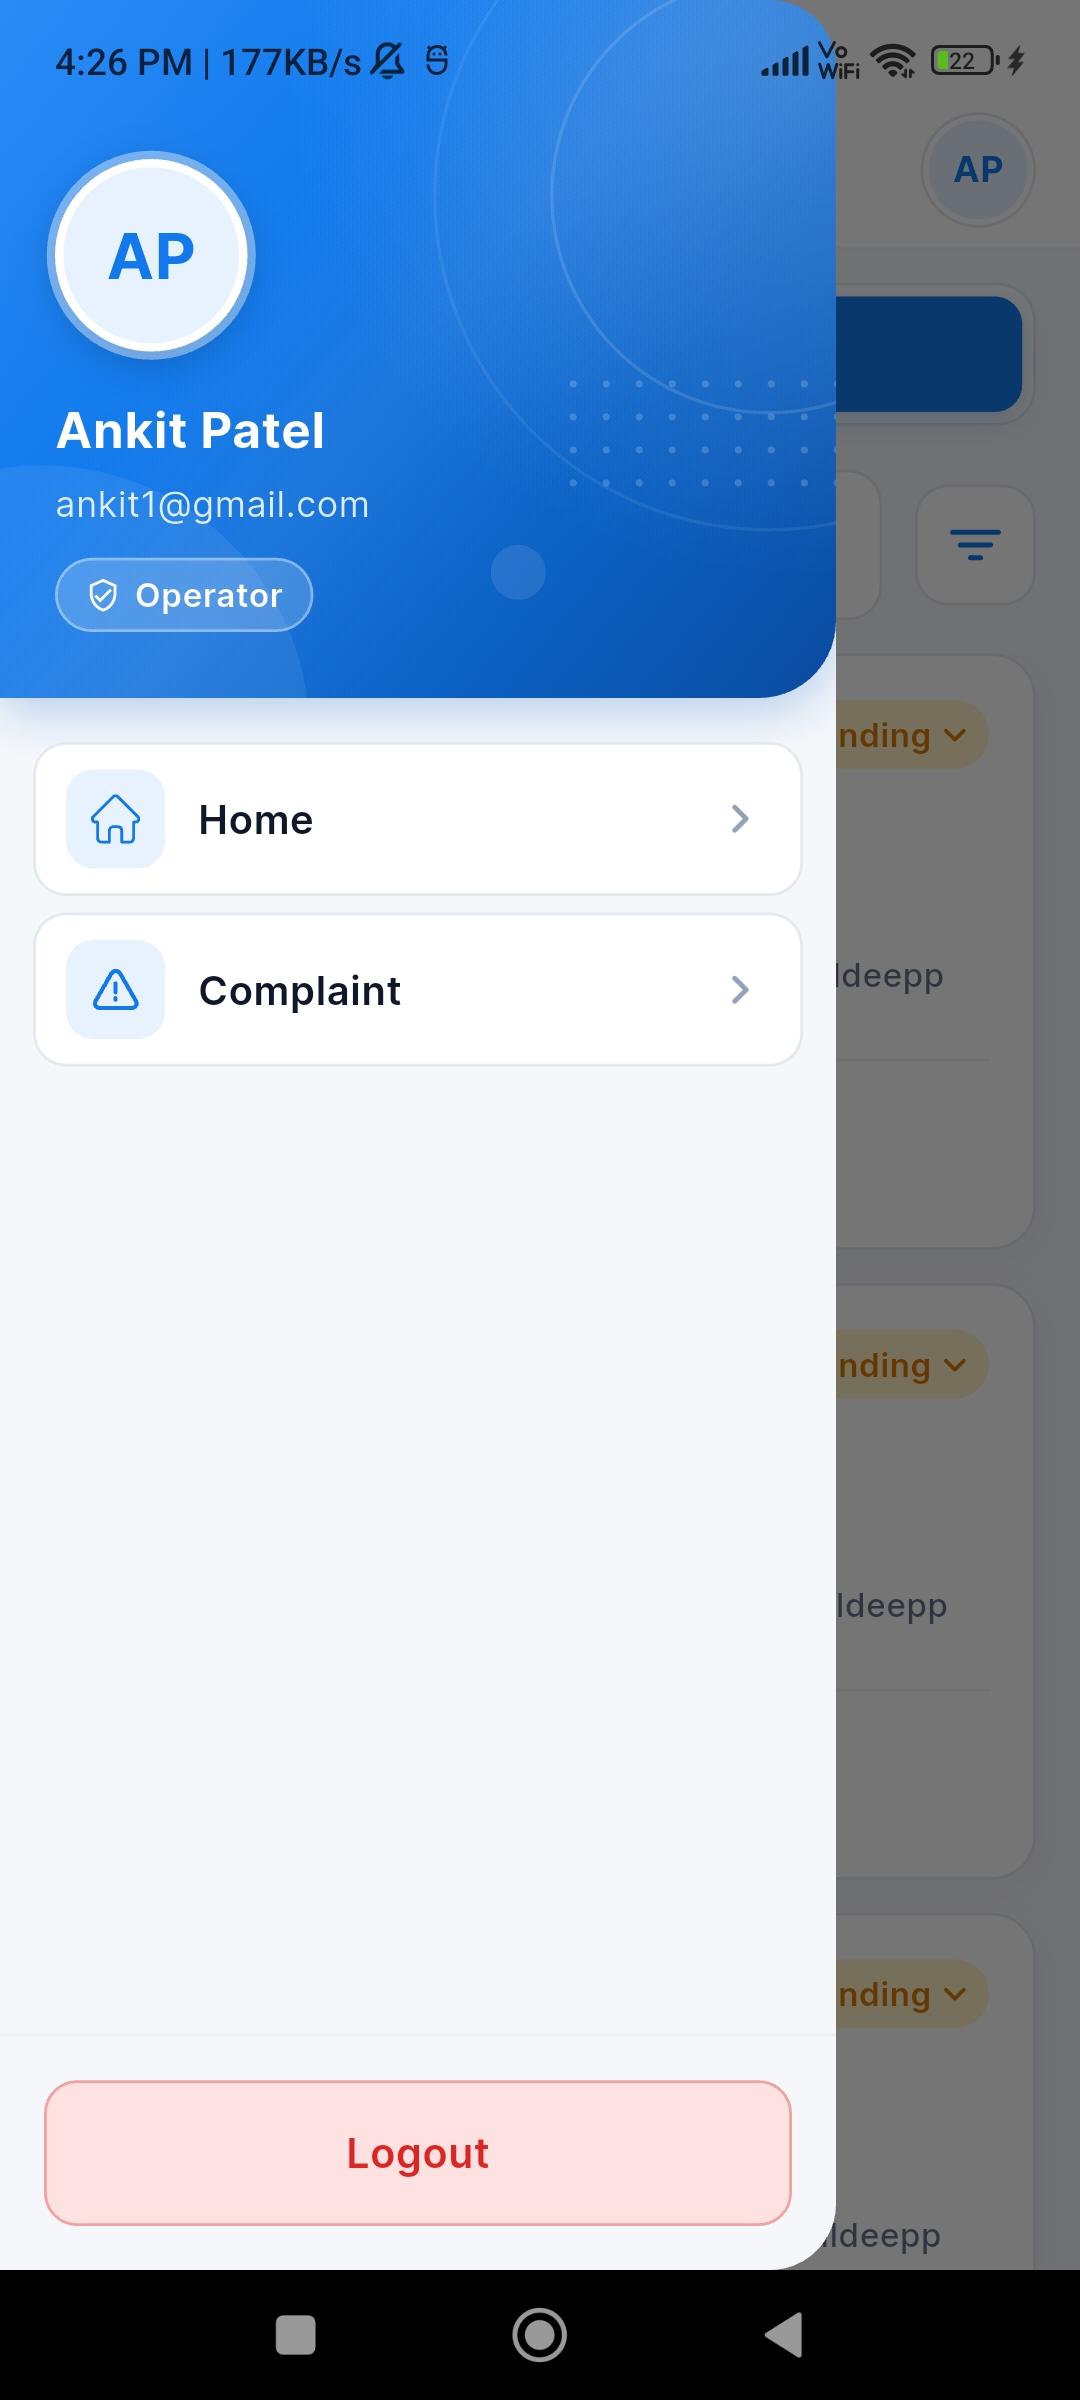
Operator menu
The operator menu shows the user's name, e-mail and the Operator badge, with Home and Complaint.
Operators have a simple menu because their main job is to report issues and follow them up.
Key points
Home shows the operator's complaints.
Complaint opens the form to raise a new one.
2
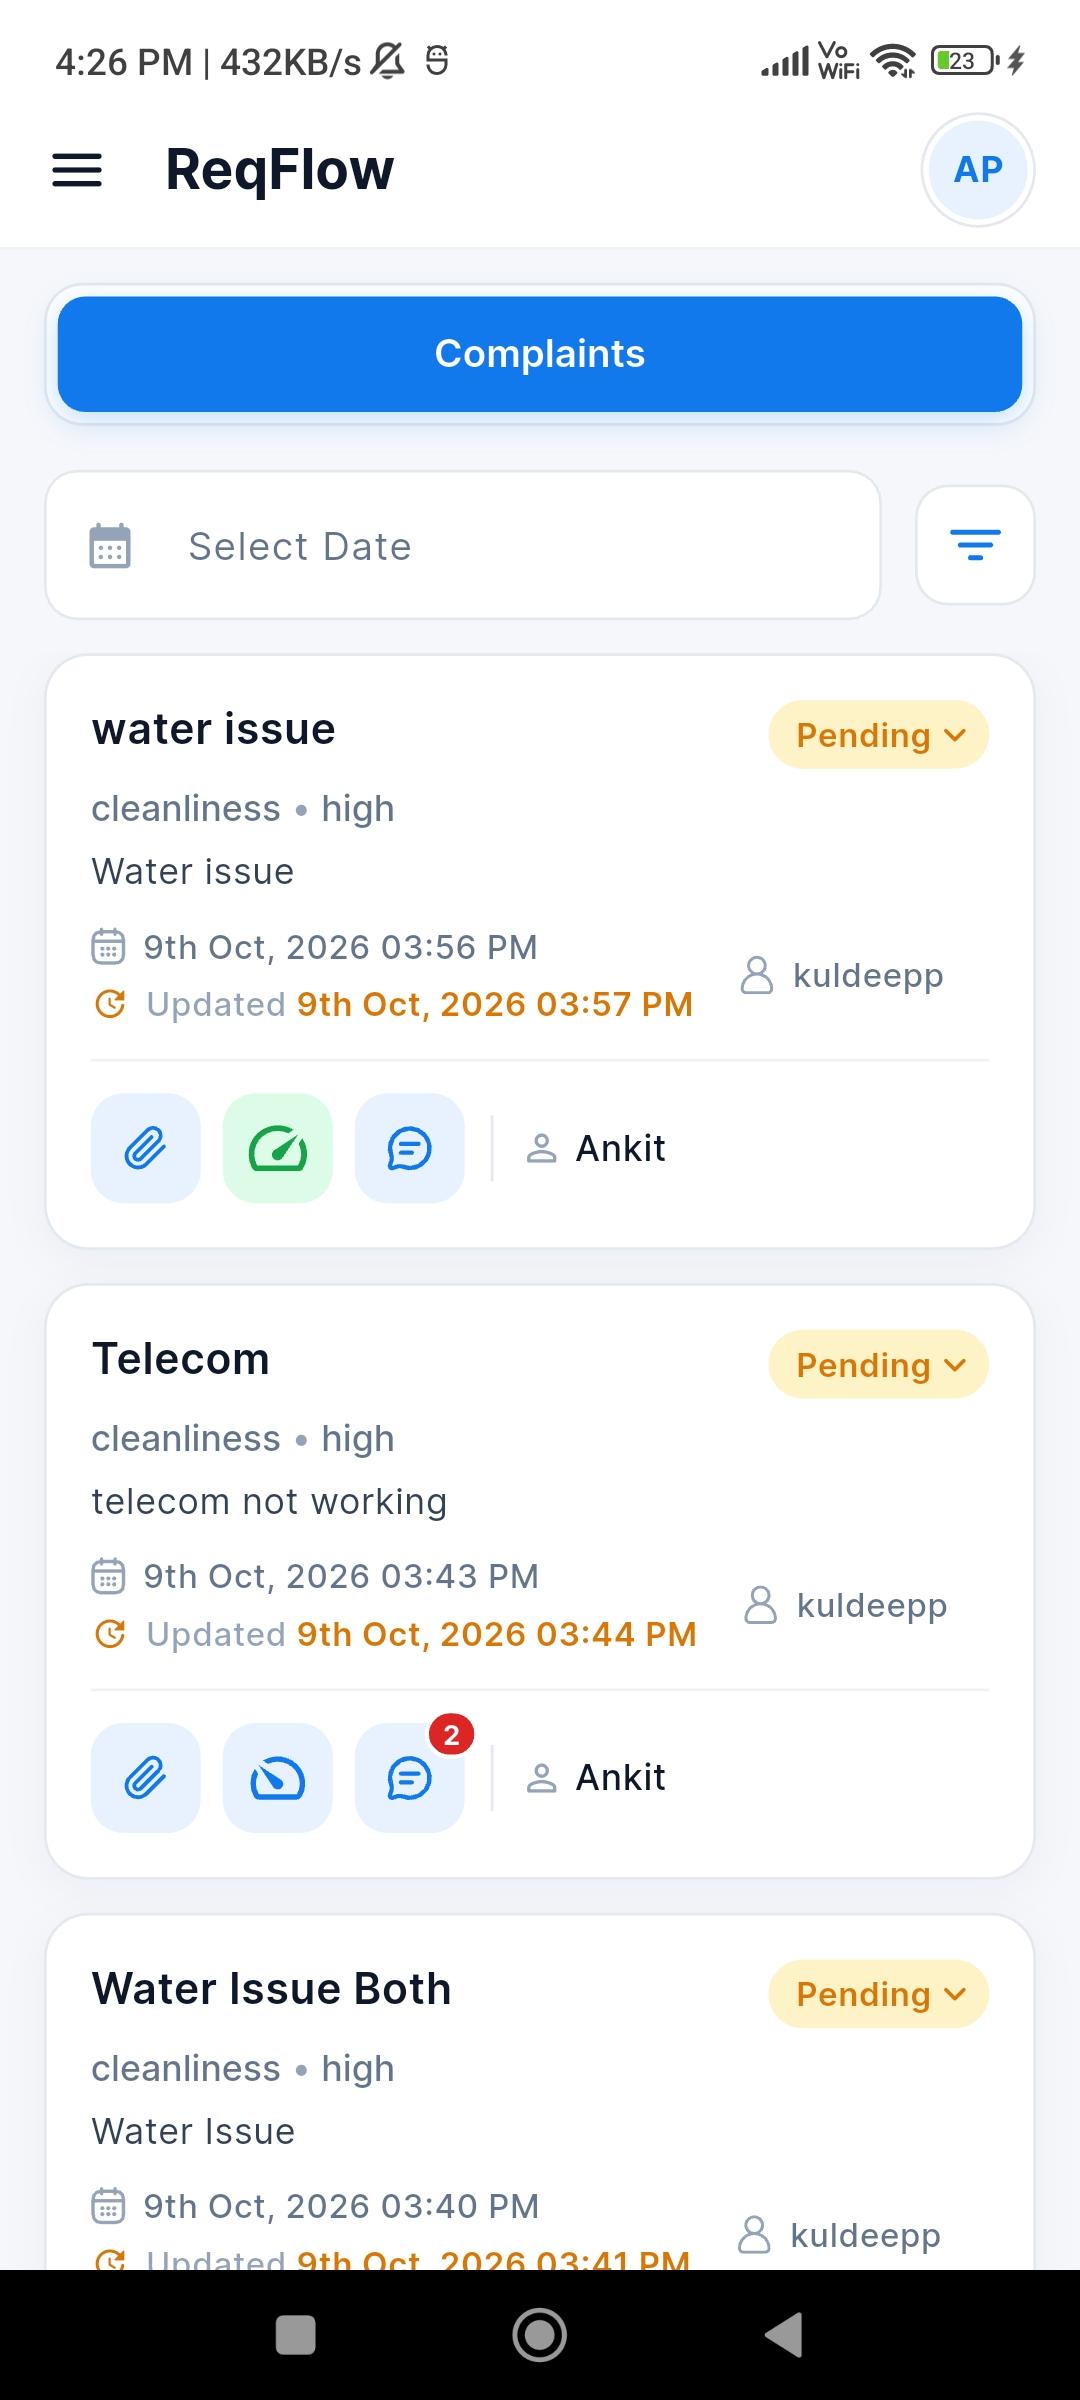
My complaints
The operator sees the complaints they raised, with the type, priority, status, created and updated time, and the maintenance user handling each one.
They get a notification when a maintenance user claims their complaint and when its status changes, so they always know what is happening without having to call anyone.
Key points
Use the comment button to talk to the maintenance user.
Send an urgent reminder if a complaint has been pending too long.
Add photos with the paperclip to show the problem clearly.
3
Add Complaint
The operator uses this form to report a new issue. The form has two parts: Complaint Details (a short title and a description of up to 500 characters) and Category & Priority (the complaint type and how urgent it is).
When the complaint is submitted, it starts as Pending and the people responsible are notified on their phones straight away. The HOD and admin team see it immediately.
Key points
Title, complaint type and priority are required; the description is optional.
Priority can be Low, Medium or High, so urgent issues stand out in every list.
The complaint type decides which maintenance users can see and claim it.
5
Maintenance
Who
Technicians and support staff who fix the issues.
Can do
See complaints for the complaint types assigned to them, claim them, work on them and discuss them in the comments.
1
Maintenance menu
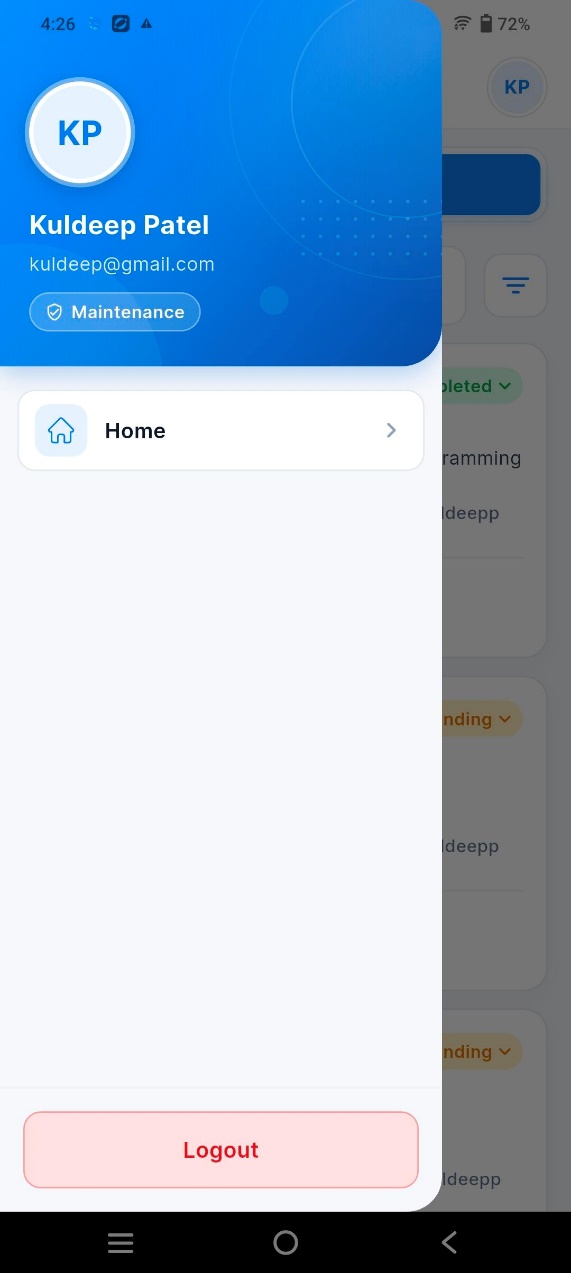
Maintenance users have the simplest menu: only Home and Logout, with their name, e-mail and the Maintenance badge.
This keeps their attention on the complaints they need to fix.
Key points
Home lists the complaints for the complaint types they handle.
2
Claim a complaint
Maintenance users see the complaints for their complaint types. A complaint that nobody has taken yet shows a blue Claim button.
Tapping Claim makes that maintenance user its owner. The person who raised it, the HOD and the admin team are notified, and the complaint card then shows who is working on it.
Key points
A complaint can be claimed by only one maintenance user, so work is never duplicated.
Use comments and attachments to share updates and photos of the fix.